Author: AvaTurner

  • Fizzy Wilderness: Crafting the Perfect Sprite Slushie

    Fizzy Wilderness: Crafting the Perfect Sprite Slushie

    Imagine stumbling into a summer backyard, cool breeze tousling your hair, and craving a refresh that sparks childhood joy. The Sprite Slushie isn’t just a drink; it’s a flashback wrapped in icy crunch and citrus zing, transforming a simple soda into a frozen adventure. Adding just a twist of lime and a dash of patience turns your kitchen into a vintage soda fountain.

    This recipe offers a chance to rediscover frozen fun, especially when the heat turns relentless. No fancy gadgets needed—just a freezer stash and a splash of imagination. It’s about relishing small chaos, like liquid sparkles bursting with each sip, reminding us that dessert should be playful, spirited, and a little rebellious.

    Sprite Slushie

    The Sprite Slushie is a frozen beverage made by blending lemon-lime soda with ice until it reaches a thick, icy consistency. It features a bright citrus flavor with a crunchy, granular texture from the crushed ice, creating a refreshing, dessert-like treat. The final appearance is a vibrant, frosty drink with a slightly slushy surface, perfect for hot summer days.
    Prep Time 5 minutes
    Total Time 5 minutes
    Servings: 2
    Course: Main Course
    Cuisine: American
    Calories: 150

    Ingredients
      

    • 1 cup lemon-lime soda chilled for best results
    • 1 cup ice cubes crushed or whole
    • 1 dash lime juice optional, for extra zing

    Equipment

    • Blender
    • Measuring cup

    Method
     

    1. Measure out the lemon-lime soda and ice cubes, and pour the soda into your blender.
    2. Add the ice cubes to the blender with the soda, ensuring there’s enough to create a thick, icy mixture.
    3. If desired, pour in a dash of lime juice to enhance the citrus flavor.
    4. Secure the lid on the blender and blend on high until the mixture is smooth but still thick and icy, about 20-30 seconds.
    5. Check the consistency; it should be similar to a granita, with tiny ice crystals and a vibrant, bubbly foam on top.
    6. Pour the slushie into glasses, watching the icy texture and bright fizz settle in.

    Notes

    For a more viscous texture, add a bit more soda or reduce the ice slightly. Serve immediately for the best icy crunch.
    Taking a moment to enjoy a Sprite Slushie feels like pressing a refresh button on your day. Its simple pleasure fuels spontaneous smiles and joyful memories of summer daylight. Whether you’re cooling down after a walk or celebrating little wins, this icy treat fits seamlessly into any moment.

    In a world rushing past, this frozen soda serves as a small pause for delight. The crisp burst of lime and fizzy sparkle bring a touch of childhood magic back to the season’s warmth. Keep a batch in the freezer for bursts of icy happiness whenever life needs a little extra sparkle.

  • Chill Out with an Unexpected Blueberry Slushie Twist

    Chill Out with an Unexpected Blueberry Slushie Twist

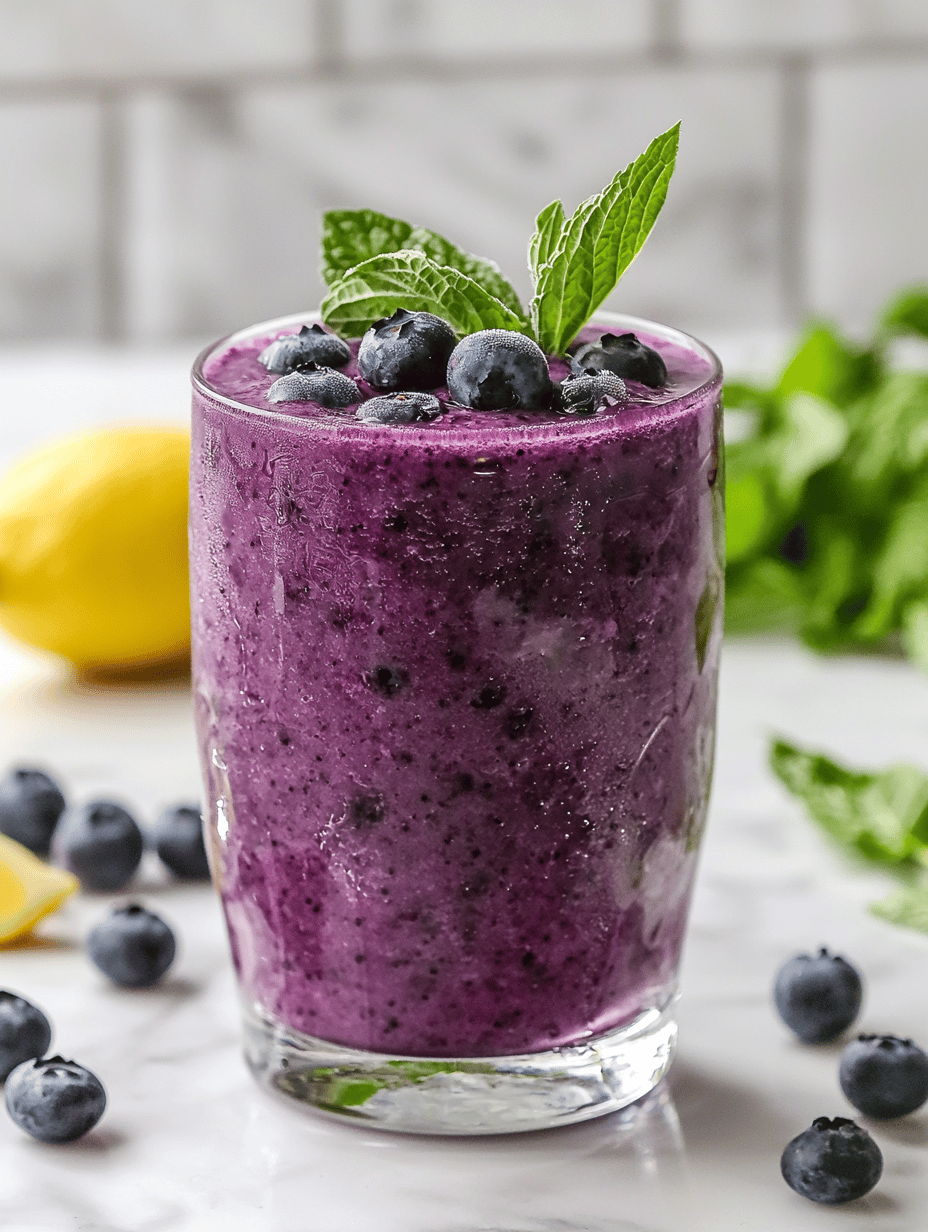
    As summer stretches its lazy days, I find myself craving more than just a typical cold drink. Instead, I wondered if I could elevate the classic blueberry slushie with a surprising ingredient that would tingle my senses.

    Imagine biting into a burst of blueberries, then suddenly tasting a hint of herbal freshness that makes you pause and smile. This blend transforms an ordinary frozen treat into something playful and unexpectedly complex. It’s a reminder that even the simplest recipes can hold delightful secrets.

    WHY I LOVE THIS RECIPE?

    • The burst of vibrant blueberry flavor makes my mornings feel alive.
    • It’s a nostalgic twist that reminds me of childhood summers, but with grown-up freshness.
    • I love how easy it is to adapt with pantry staples—no special trips needed.
    • Blending herbs like basil adds a surprisingly refreshing layer to the cool, sweet berries.
    • The natural color and aroma lift my mood instantly.

    AVOID MY DISASTER (You’re Welcome)

    • FORGOT to freeze the blueberries overnight? Run them under cold water to speed up chilling.
    • DUMPED too much honey? Add a splash of lemon juice to balance the sweetness.
    • OVER-TOOLED the herb? Rinse and reduce the amount next time for a gentler flavor.
    • FORGOT the lemon juice? Add a quick squeeze before serving for brightness.

    QUICK FIXES THAT SAVE YOUR DAY

    • When the mixture is too thick, splash in some cold water to loosen it up.
    • SHIELD against dullness by tossing in a slice of fresh lemon for zing.
    • When smoothies are too icy, let sit for 5 minutes to soften slightly.
    • PATCH overly sweet flavor with an extra squeeze of lemon or lime.
    • Splash a bit of vanilla extract for a warm, cozy aroma that complements the berries.

    Enjoying this blueberry slushie now feels like a small rebellion against the sweltering heat. The herbs add a fresh, fragrant twist that keeps it exciting and unexpected. It’s a perfect way to refresh without fuss, using only what’s in the pantry.

    Every sip sparks a faint memory of sun-drenched afternoons, mingled with crisp, cool comfort. Whether you’re seeking a peaceful escape or a playful treat, this recipe fills the need beautifully. It’s simple, lively, and just a little bit different.

    Blueberry Herb Slushie

    This blueberry herb slushie is made by blending frozen blueberries with fresh herbs like basil, sweetener, and lemon juice to create a vibrant, icy beverage. The result is a visually appealing, smooth-textured slushie with a burst of fruity flavor and a refreshing herbal note.
    Prep Time 10 minutes
    Total Time 10 minutes
    Servings: 2
    Course: Main Course
    Calories: 80

    Ingredients
      

    • 2 cups frozen blueberries preferably frozen overnight
    • 1 bunch fresh basil leaves about 8-10 leaves
    • 2 tablespoons honey adjust to taste
    • 1 tablespoon fresh lemon juice about half a lemon
    • 0.5 cup cold water

    Equipment

    • Blender
    • Measuring cups and spoons

    Method
     

    1. Add the frozen blueberries to your blender, ensuring they are evenly spread out for smooth blending.
    2. Drizzle in the honey, measuring carefully to balance sweetness, and squeeze in the lemon juice for brightness.
    3. Pour in the cold water to help the mixture blend smoothly and achieve a slushy texture.
    4. Secure the lid on the blender and blend on high until the mixture is thick, icy, and uniformly smooth, about 30-40 seconds. You should hear a consistent whir and see the mixture turn a vibrant purple-blue color.
    5. Stop the blender and check the consistency; if it’s too thick, add a splash of cold water and blend again briefly.
    6. Pour the slushie into glasses, and garnish with a small basil sprig or a few blueberries if desired for a pretty presentation.
    7. Serve immediately while icy and chilled, enjoying the bright, refreshing flavors with a hint of herbal aroma.
    This recipe captures the essence of summer’s joyful chaos. It’s a bright, flavorful reminder that small changes can lead to delightful surprises. Make it when you want something quick, colorful, and that extra touch of fresh flavor.

    No matter how many slushies you’ve made before, this version stands out with its herbal hint and vibrant hue. It’s perfect for hot days, lazy brunches, or spontaneous get-togethers. Keep the ingredients handy, and a refreshing moment is always within reach.

  • Hidden Gem: Roasted Butternut Squash & Carrot Soup for Cold Days

    Hidden Gem: Roasted Butternut Squash & Carrot Soup for Cold Days

    Imagine the warm aroma of roasted vegetables filling your kitchen, the sweet scent of caramelized butternut squash mingling with earthy carrots. This soup transforms simple ingredients into a velvety, comforting bowl that feels like a hug on a chilly day. It7s a quiet celebration of fall flavors, perfect when you want something cozy and nourishing.

    What sets this recipe apart is its emphasis on roasting, which intensifies the natural sweetness and adds depth to every spoonful. The process is no-fuss but results in a surprisingly complex flavor profile. Plus, it’s a great way to use up those seasonal vegetables sitting at the back of your fridge.

    Roasted Butternut Squash and Carrot Soup

    This soup features roasted butternut squash and carrots that develop a sweet, caramelized flavor during baking. The vegetables are blended into a smooth, velvety puree, resulting in a comforting, autumnal dish with a rich texture and vibrant color. The roasting process enhances their natural sweetness and deepens the overall flavor profile.
    Prep Time 15 minutes
    Cook Time 30 minutes
    Total Time 45 minutes
    Servings: 4
    Course: Main Course
    Cuisine: Fall, Vegetarian
    Calories: 180

    Ingredients
      

    • 1 large butternut squash peeled, seeded and cubed
    • 3 large carrots peeled and sliced
    • 2 tablespoons olive oil for roasting
    • 1 small onion roughly chopped
    • 2 cloves garlic minced
    • 4 cups vegetable broth
    • to taste salt and pepper

    Equipment

    • Baking sheet
    • Blender or immersion blender
    • Knife
    • Cutting board
    • Large pot or saucepan
    • Measuring cups and spoons

    Method
     

    1. Preheat your oven to 400°F (200°C). Place the cubed butternut squash and sliced carrots on a baking sheet. Drizzle with olive oil and toss to coat evenly.
    2. Roast the vegetables in the oven for about 25-30 minutes, or until they are tender and lightly caramelized around the edges. The aroma will be sweet and inviting.
    3. While the vegetables roast, chop the onion and mince the garlic. Sauté them in a large pot over medium heat with a splash of oil until translucent and fragrant, about 5 minutes.
    4. Add the roasted vegetables to the pot with the sautéed aromatics. Pour in the vegetable broth, then season with salt and pepper to taste.
    5. Bring the mixture to a gentle boil, then reduce the heat and simmer for about 10 minutes, allowing flavors to meld.
    6. Remove the soup from heat and blend until smooth using an immersion blender directly in the pot, or transfer to a blender in batches. Blend until silky and creamy.
    7. Taste and adjust seasoning with additional salt and pepper if needed. Return to the stove briefly if reheating is required.
    8. Pour the hot soup into bowls and serve immediately, garnished with a drizzle of olive oil, a sprinkle of cracked pepper, or fresh herbs if desired.

    Notes

    For extra richness, add a splash of coconut milk or your favorite cream before blending. Leftovers can be stored in the refrigerator for up to 3 days.

    This roasted butternut squash and carrot soup isnt just a meal; itfs an experience—smooth, slightly sweet, with a whisper of smoky char. On chilly evenings or when you need a quick but satisfying lunch, itfs a sure go-to that warms you from the inside out.

    Enjoying a bowl like this feels like a small act of self-care, a reminder that simple ingredients can come together to create something truly comforting. As the seasons change, this soup remains a cozy staple, easy to adapt with various herbs or a burst of fresh lemon. Sometimes, the best meals are the ones that invite a moment of pause and gratitude.

  • A Mind-Bending Halloween Brain Jello Mold That Turns Heads

    A Mind-Bending Halloween Brain Jello Mold That Turns Heads

    Every October, I love diving into the strange and spooky realm of Halloween treats, but this year I wanted to do something utterly unexpected. Instead of the usual candies or pumpkin-shaped goodies, I decided to craft a stunning Brain Jello Mold that looks disturbingly real. The moment I unmolded it, my friends’ eyes widened with a mix of fascination and squeamish delight.

    This recipe is a wild ride in texture and color, blending the gooey and wobbly nature of Jello with the eerie shape of a brain. It’s perfect for a Halloween party that’s equal parts creepy and fun, offering a brief moment of jaw-dropping surprise. Plus, it’s surprisingly easy to assemble, making it accessible for all your ghoulish gatherings.

    Brain Jello Mold

    This dish is a gelatin dessert molded into an intricate brain shape, featuring a wobbly, semi-translucent texture with a detailed, convoluted appearance. Made with flavored gelatin and a layered or textured method to resemble brain tissue, it creates an eerie visual effect perfect for Halloween parties.
    Prep Time 20 minutes
    Cook Time 10 minutes
    Total Time 30 minutes
    Servings: 8
    Course: Main Course
    Cuisine: Halloween
    Calories: 50

    Ingredients
      

    • 1 package flavored gelatin (e.g., cherry or raspberry) preferably unflavored for vibrant color
    • 2 cups boiling water
    • 1 cup cold water
    • Optional to taste food coloring or heavy cream for extra effect or color variation

    Equipment

    • Mixing bowls
    • Measuring cups and spoons
    • Whisk
    • Brain-shaped mold
    • Saucepan
    • Spray oil or cooking spray

    Method
     

    1. Spray the inside of your brain-shaped mold with a light coating of cooking spray to ensure easy unmolding.
    2. Pour the flavored gelatin powder into a mixing bowl and add boiling water, stirring continuously until the gelatin is completely dissolved and the mixture is smooth and clear.
    3. Add the cold water and stir well to combine, which helps the gelatin set evenly and improves the texture.
    4. If desired, add a few drops of food coloring or some heavy cream to create veins or color variations that resemble brain tissue.
    5. Pour the gelatin mixture into the prepared mold, filling it almost to the top to achieve a detailed shape.
    6. Transfer the mold to the refrigerator and let it chill for at least 4 hours or until fully set, giving the gelatin a firm, jiggle-ready consistency.
    7. Once set, gently unmold the gelatin by inverting the mold onto a plate or tray, encouraging a slow natural release to preserve the detailed shape.
    8. Carefully peel or lift away the mold to reveal your realistic brain-shaped gelatin sculpture, adjusting any edges with a knife if needed.
    9. Optional: Using a piping bag or spoon, add additional
    10. Arrange your brain Jello on a spooky platter, ready to serve and surprise your Halloween guests with its creepy, realistic appearance.

    Notes

    For extra creepiness, add plastic eyes or fake blood around the base. Make sure to use a mold that captures detailed ridges to mimic a real brain.

    This Brain Jello Mold isn’t just about the shock factor; it’s about creating a memorable centerpiece that sparks conversation. As the party dies down, the leftover Jello is a surprisingly tasty treat with hints of vanilla and fruit flavoring shining through the eerie exterior. It’s a playful twist on holiday traditions that celebrates the spooky spirit of Halloween.

    In a season full of fall’s rich aromas and harvest cheer, this dish brings a quirky, colorful break. It’s a reminder that sometimes, being a little gross makes the party more memorable—though don’t be surprised if a few guests are hesitant to dig in at first. Cheers to a Halloween that’s just as silly as it is spooky!

  • Spooky Pumpkins: Halloween Pumpkin Cheesecake Bars That Play with Flavors

    Spooky Pumpkins: Halloween Pumpkin Cheesecake Bars That Play with Flavors

    Imagine biting into a pumpkin cheesecake bar that whispers tales of autumn harvests and ghostly gardens. This recipe transforms a simple fall favorite into an eerie yet elegant treat, perfect for haunted house parties or cozy family gatherings. It’s a delightful way to celebrate the season, blending spices and sweetness in every layered slice.

    The secret lies in adding a dash of unexpected spice—perhaps a hint of cardamom or a splash of bourbon—that elevates the familiar pumpkin flavor to something almost hauntingly delicious. These bars are not just festive; they’re whispering promises of vanilla, cinnamon, and that unmistakably rich cream cheese undertone. Prepare for a culinary adventure that’s as enchanting as a moonlit night.

    Pumpkin Cheesecake Bars

    Pumpkin cheesecake bars are layered treats featuring a spiced pumpkin filling atop a buttery crust, finished with a creamy cheese layer. The dessert is baked until set, offering a smooth, dense texture with a golden crust and a rich pumpkin flavor accented by warm spices. Their appearance is typically a golden-topped, bar-shaped masterpiece perfect for autumn celebrations.
    Prep Time 20 minutes
    Cook Time 45 minutes
    Total Time 1 hour 5 minutes
    Servings: 12
    Course: Main Course
    Cuisine: American
    Calories: 320

    Ingredients
      

    • 1 3/4 cups graham cracker crumbs
    • 1/2 cup granulated sugar
    • 1/2 cup unsalted butter, melted
    • 16 oz cream cheese, softened
    • 1 cup canned pumpkin pure pumpkin puree
    • 3/4 cup granulated sugar
    • 2 large eggs
    • 1 1/2 teaspoons ground cinnamon
    • 1/2 teaspoon ground ginger
    • 1/4 teaspoon ground nutmeg
    • 1/4 teaspoon salt

    Equipment

    • Electric Mixer
    • 9×13 inch Baking Pan

    Method
     

    1. Mix graham cracker crumbs and sugar in a bowl, then stir in melted butter until the mixture resembles wet sand. Press this evenly into the bottom of a greased 9×13-inch baking pan to form the crust.
    2. Bake the crust in a preheated oven at 350°F (175°C) for 10 minutes until just set and fragrant. Remove from oven and let it cool slightly while preparing the filling.
    3. In a large mixing bowl, beat softened cream cheese and sugar with an electric mixer until smooth and creamy, about 2-3 minutes. This creates a rich, fluffy layer for the filling.
    4. Add the pumpkin puree to the cream cheese mixture and beat until fully combined, creating a vibrant, thick pumpkin layer.
    5. Crack in the eggs one at a time, beating well after each addition. The mixture should become smooth and slightly aerated.
    6. Mix in cinnamon, ginger, nutmeg, and salt until fragrant and evenly distributed, giving the filling warm, spicy notes.
    7. Pour the pumpkin mixture over the cooled crust, spreading evenly with a spatula. Smooth the top for a uniform appearance.
    8. Bake in the oven at 350°F (175°C) for about 35-40 minutes, or until the edges are set and a toothpick inserted in the center comes out clean.
    9. Remove from the oven and let the bars cool completely in the pan on a wire rack before refrigerating for at least 2 hours to allow the layers to set fully.
    10. Slice into squares, serve chilled or at room temperature, and enjoy the creamy, spiced pumpkin cheesecake bars with a graham cracker crust.

    As the last crumb disappears, you realize these pumpkin cheesecake bars could become your annual Halloween tradition. Their perfect balance of spice, sweetness, and creaminess makes them a hit among kids and adults alike. Plus, the ease of assembly means you can focus on costume planning and spooky decorations.

    In the end, it’s all about creating moments of joy around the table—especially with treats that look as captivating as they taste. With a little creativity and a pinch of chaos, these bars will surely become part of your seasonal celebrations. Nothing beats the magic of homemade warmth on a chilly October night.

  • Spooky Good: Halloween Pumpkin Rice Krispie Treats with a Sewn-Scarred Twist

    Spooky Good: Halloween Pumpkin Rice Krispie Treats with a Sewn-Scarred Twist

    Halloween treats often focus on the spooky or the sweet, but I love adding a little chaos and mystery to my kitchen. This year, I decided to create Rice Krispie treats shaped like mini pumpkins, but with a twist—each one tells a tiny, edible horror story. As I melted the marshmallows, the aroma of caramelized sugar mixed with fall spices made my kitchen smell like a witch’s cauldron.

    Transforming a simple snack into a seasonal spectacle is an act of joyful chaos. These pumpkin-shaped Krispie treats are perfect for those who love fun, slightly eerie edible creations. Plus, they’re so easy to make that even the most butter-fingered baker can whip them up in no time.

    Mini Pumpkin Rice Krispie Treats with Edible Horror Stories

    These rice crispy treats are shaped into mini pumpkins using orange-colored marshmallows and coated with a caramel-spiced glaze, giving them a festive appearance. The treats have a crispy, chewy texture with a smooth, melt-in-your-mouth interior, topped with decorative green stems and spooky details. They are quick to assemble and perfect for seasonal celebrations or Halloween parties.
    Prep Time 15 minutes
    Cook Time 10 minutes
    Total Time 25 minutes
    Servings: 12
    Course: Main Course
    Cuisine: American
    Calories: 150

    Ingredients
      

    • 6 cups marshmallows preferably orange-tinted or colored with food coloring
    • 4 tablespoons unsalted butter plus extra for greasing
    • 6 cups rice cereal
    • 1 teaspoon fall spice mix cinnamon, nutmeg, ginger, optional
    • 1 cup green candy melts or green icing for stems and spooky details
    • additional decorative green sugar or sprinkles optional for added texture

    Equipment

    • Saucepan
    • Silicone spatula
    • Pumpkin-shaped silicone mold or freehand shaping tools
    • Parchment paper
    • Cooling rack

    Method
     

    1. Grease your pumpkin-shaped molds or work on parchment paper for shaping the treats by hand. Melt the butter in a large saucepan over medium heat until it starts to bubble and smell nutty, about 2 minutes.
    2. Add the marshmallows to the melted butter, stirring constantly until they are fully melted and smooth. The mixture should be glossy and bubbly, with a fragrant, sweet aroma filling the kitchen.
    3. Remove the pan from heat, then quickly stir in the fall spice mix until evenly distributed. Mix in the rice cereal gradually, folding with a spatula until the cereal is well coated and the mixture feels thick and sticky.
    4. While still warm, press the mixture into the prepared silicone mold or shape into pumpkin forms with your hands. Gently press down to make sure each treat has a firm, rounded pumpkin shape. Allow them to cool and set for at least 15 minutes.
    5. Once set, melt the green candy melts or prepare green icing according to package instructions. Dip the top of each pumpkin to create a small stem or use a piping tool to add the stems and spooky details. Let the decorations harden slightly.
    6. If desired, sprinkle green sugar or sprinkles on top for extra fun and texture. Arrange the finished treats on a cooling rack or serving platter. Enjoy these crispy, chewy, and festive pumpkin treats.

    Notes

    For best shapes, use silicone molds. The marshmallow mixture can be colored with orange food coloring if desired. These treats are best enjoyed fresh but can be stored in an airtight container for up to 2 days.
    These Halloween Pumpkin Rice Krispie Treats are more than just a fun snack—they’re a playful nod to fall festivities. Their bright orange hue and spooky embellishments add a touch of mischievous charm to any Halloween table.

    Sharing these treats is a small act of seasonal mischief, and watching friends’ delight turns an ordinary day into a celebration. Whether you’re throwing a party or just want a quick, festive snack, they’re sure to bring laughs and a few shivers. Happy haunting and snacking!

  • One-Pan Fall Chicken Dinner: A Cozy Autumn Escape

    One-Pan Fall Chicken Dinner: A Cozy Autumn Escape

    This recipe turns the mundane into a celebration of autumn. Instead of a typical roasted chicken, I embrace the chaos of a single sheet pan, layered with the warm scents of cinnamon, thyme, and sweet potatoes. It captures the fleeting essence of fall, with every bite whispering seasonal comfort.

    What makes this dish special is its imperfect rhythm—crisp edges, tender insides, and the fragrant aroma that fills the kitchen. It’s perfect for those busy days when you crave something hearty yet straightforward, with natural flavors that shout fall. No fuss, just pure, cozy nourishment served on a single pan.

    Sheet Pan Cinnamon Thyme Roasted Chicken with Sweet Potatoes

    This dish features a whole chicken that is roasted on a sheet pan alongside sweet potatoes and aromatics. The chicken develops crispy skin while remaining tender inside, with caramelized vegetables and fragrant seasoning creating a rustic, fall-inspired presentation.
    Prep Time 15 minutes
    Cook Time 45 minutes
    Total Time 1 hour
    Servings: 4
    Course: Main Course
    Cuisine: American
    Calories: 580

    Ingredients
      

    • 1 whole chicken, whole patted dry
    • 2 large sweet potatoes peeled and cubed
    • 3 tablespoons olive oil divided
    • 1 teaspoon ground cinnamon for seasoning
    • 1 teaspoon dried thyme or fresh thyme if available
    • to taste salt and freshly ground black pepper

    Equipment

    • Sheet pan
    • Kitchen tongs

    Method
     

    1. Preheat your oven to 400°F (200°C). Rub the whole chicken generously with salt, pepper, cinnamon, and thyme, ensuring all sides are seasoned evenly.
    2. Place the seasoned chicken on the center of a large sheet pan. Drizzle the chicken with a tablespoon of olive oil and massage it into the skin for even browning.
    3. Scatter the cubed sweet potatoes around the chicken, then drizzle them with the remaining two tablespoons of olive oil. Toss gently to coat all pieces evenly with oil and spices.
    4. Transfer the sheet pan to the oven and roast for about 45 minutes, or until the chicken skin is golden and crispy, and the sweet potatoes are tender and caramelized. Baste the chicken with juices from the pan halfway through if desired.
    5. Remove the sheet pan from the oven and rest the chicken for 10 minutes before carving. The sweet potatoes should be soft with slightly crispy edges, while the chicken skin is crispy and aromatic.
    6. Carve the chicken and serve alongside the roasted sweet potatoes, garnished with fresh thyme if desired. Enjoy the crispy skin contrasted with tender, flavorful meat and caramelized vegetables.

    As the oven’s warmth starts to drift out with that unmistakable smell of roasting garlic and caramelized vegetables, I feel a gentle reminder of autumn’s quiet beauty. This dish is a small, satisfying celebration of the season, perfect for chilly evenings or lazy weekends.

    Sharing a single pan brings a sense of simplicity and joy. It’s about savoring the flavors, the smells, and the fleeting nature of fall, all wrapped into one easy-to-make meal. Sometimes the best surprises come from the simplest dinners.

  • Spooktacular Secret: The Haunted Ghost Veggie Platter

    Spooktacular Secret: The Haunted Ghost Veggie Platter

    As a food enthusiast who loves a good challenge, I recently decided to turn my veggie platter into a haunting masterpiece that surprises both kids and adults. This isn’t just any snack; it’s a playful, spooky centerpiece that sparks conversations and sparks nostalgia. The eerie white ghosts made from simple vegetables become the star of my Halloween table.

    Creating these ghostly veggies was a delightful adventure—tearing, shaping, and assembling became part of the fun. The way the carrots and cauliflower come together to mimic tiny floating spirits makes my stomach smile just thinking about the reactions they’ll get. Plus, it’s a healthy twist on the usual Halloween treats that often lean into the sugary side.

    Spooky Ghost Veggie Platter

    This dish features carved cauliflower florets and carrot sticks shaped into small ghost figures, assembled to create a playful Halloween centerpiece. The vegetables are shaped and arranged to resemble floating spirits with simple decorations for facial features, providing a healthy and fun party snack. The final presentation is a whimsical, ghostly display perfect for festive gatherings.
    Prep Time 20 minutes
    Total Time 20 minutes
    Servings: 8
    Course: Main Course
    Cuisine: Festive
    Calories: 15

    Ingredients
      

    • 1 head cauliflower fresh, large head
    • 2-3 large carrots preferably large for easy shaping
    • Black edible marker, or small bits of nori or seaweed n/a facial features or facial stickers to decorate the ghosts

    Equipment

    • Knife
    • Cutting board
    • Toothpicks or small skewers
    • Plate

    Method
     

    1. Rinse the cauliflower and cut it into small, manageable florets suitable for ghost shapes.
    2. Peel the carrots and cut off the ends to create uniform sticks for the ghost bodies. Aim for about 2-3 inches in length.
    3. Shape the cauliflower florets by gently tearing or trimming them to resemble small ghost figures, roughly rounding the tops to look like heads.
    4. Skewer a cauliflower floret onto a carrot stick or attach them together with a toothpick for stability, creating a tiny ghost figure with a head and body.
    5. Repeat the process, shaping and assembling as many ghost figures as needed for your platter.
    6. Arrange the assembled ghosts on a serving plate, spacing them out to look like they are floating.
    7. Use a black edible marker or small bits of nori to add facial features—two eyes and a mouth—on each ghost for a spooky expression.
    8. Optionally, place the vegetables on a bed of greens or a decorative plate to enhance the presentation.
    9. Carefully transport your spooky ghost veggie platter to the table, ready to surprise and delight guests of all ages.

    Notes

    Use fresh, firm vegetables for best shaping. Ensure facial features are securely attached if using stickers or markers. This dish is best served immediately for facial features to stay visible.
    This ghost veggie platter isn’t just a playful way to enjoy your healthy greens. It’s a simple, no-fuss idea that adds a splash of charm and whimsy to any Halloween gathering. As the evening winds down, I love seeing kids and grown-ups alike marvel at these little spectral bites. Sometimes, a little extra effort turns ordinary into unforgettable.

  • Spooky Bats and Creepy Guac: Halloween Snack Attack!

    Spooky Bats and Creepy Guac: Halloween Snack Attack!

    Halloween is the only time when chaos meets creativity in the kitchen. This year, I wanted to craft something that would make both kids and adults squeal with delight—while also satisfying that irresistible craving for something savory and fun. The secret? A vibrant green guacamole accented with playful bat-shaped tortilla chips that look as wicked as they taste.

    Transforming simple ingredients into a comic horror scene takes a little bit of visualization and a dash of daring. I love how this recipe invites you to get a little messy—perfect for a spooky, spirit-lifting gathering or a cozy night of fright movies. Plus, it’s quick to assemble, letting you focus on the costume chaos while the kitchen fills with aromas of garlic, lime, and smoky chipotle.

    Green Guacamole with Bat-Shaped Tortilla Chips

    This dish features a creamy, vibrant green avocado-based guacamole, mashed to a smooth or chunky consistency. It is complemented by crunchy, bat-shaped tortilla chips made from lightly baked or fried tortillas, creating a playful and visually striking appetizer or snack.
    Prep Time 10 minutes
    Cook Time 10 minutes
    Total Time 20 minutes
    Servings: 4
    Course: Main Course
    Cuisine: Mexican
    Calories: 180

    Ingredients
      

    • 2 ripe avocados halved, pitted
    • 1 lime lime juice freshly squeezed
    • 1 small red onion finely chopped
    • 1 clove garlic minced
    • 1 small tomato seeded and diced
    • 1 teaspoon smoked chipotle chili powder adjust to taste
    • to taste salt
    • 4 small corn tortillas preferably white or yellow
    • 2 tablespoons olive oil for baking or frying

    Equipment

    • Mixing bowl
    • Fork or potato masher
    • Baking sheet
    • Knife
    • Cutting board
    • Cookie cutters in bat shape
    • Frying pan or oven

    Method
     

    1. Scoop out the flesh of the avocados into a mixing bowl, then mash with a fork or potato masher until reaching your desired chunky or creamy texture.
    2. Stir in freshly squeezed lime juice, finely chopped red onion, minced garlic, diced tomato, and smoked chipotle chili powder. Season with salt to taste, mixing everything until well combined and vibrant green.
    3. Preheat the oven to 375°F (190°C) or prepare a frying pan with a bit of olive oil for frying. If baking, brush tortillas lightly with olive oil and place on a baking sheet. For frying, cut tortillas into bat shapes using cookie cutters and fry in hot oil until crispy and golden.
    4. If baking, bake the tortilla shapes for about 8-10 minutes, or until crisp and lightly browned. If frying, cook each bat shape for 2-3 minutes per side until crispy and golden.
    5. Remove the chips from the oven or oil, then transfer to a paper towel-lined plate to drain any excess oil and cool slightly.
    6. Arrange the crispy bat-shaped chips on a serving platter, creating a spooky display. Serve the fresh guacamole on the side or dolloped on the chips for dipping.
    7. Enjoy immediately as a fun, festive appetizer or snack during your Halloween gathering.

    Notes

    For extra fun, add small food-safe face markings on the bat chips with black icing or melted chocolate. Adjust spice levels by varying smoked chili powder. You can prepare the guacamole ahead of time but assemble the chips just before serving for optimal crunch.
    In the end, this Halloween guacamole with bat-shaped chips isn’t just about the flavors—it’s about creating moments of joyful chaos in your kitchen. Watching everyone dive into the spooky snack reminds us all that cooking is just another kind of playful rebellion. Whether you’re hosting a party or just craving a fun treat, this recipe is sure to be a hit.

    As the evening winds down and the last of the tortilla bats are devoured, I always feel a little proud of my spooky handiwork. It’s a reminder that sometimes, simple ingredients can turn into the most memorable moments of the season.

  • The Cozy Charm of White Chicken Chili: A Winter Must-Have

    The Cozy Charm of White Chicken Chili: A Winter Must-Have

    Imagine a bowl that whispers comfort with every swirl, especially on chilly evenings when the cold outside makes the bones ache. White chicken chili isn’t just a dish; it’s a warm hug wrapped in a blanket of tender chicken, creamy beans, and a hint of spice that awakens the senses. The best part? Its versatility lets you tweak the heat and creaminess to suit your mood.

    This recipe takes you beyond the usual chili, embracing a tangy, herbaceous twist on classic comfort food. Its smooth, velvety texture feels like a gentle caress of flavor that settles comfortably in your stomach. Perfect for quick weeknight dinners or improvised gatherings, it’s a dish that invites stories and smiles around the table.

    White Chicken Chili

    White chicken chili is a comforting soup made with tender shredded chicken, creamy white beans, and a flavorful broth infused with spices and herbs. It has a velvety, thick texture with a tangy, herbaceous flavor profile, finished with a smooth and inviting appearance. The dish is quick to prepare and perfect for cozy evenings or weeknight dinners.
    Prep Time 15 minutes
    Cook Time 30 minutes
    Total Time 45 minutes
    Servings: 4
    Course: Main Course
    Cuisine: American
    Calories: 350

    Ingredients
      

    • 1 lb boneless, skinless chicken breasts or thighs, cooked and shredded
    • 2 cups white beans canned, drained and rinsed
    • 1 medium yellow onion finely chopped
    • 3 cloves garlic minced
    • 4 cups chicken broth
    • 1 teaspoon ground cumin
    • 1/2 teaspoon chili powder
    • 1/2 teaspoon oregano
    • 1 tablespoon olive oil
    • 1/2 cup sour cream for optional richness
    • Salt and pepper to taste

    Equipment

    • Large pot or Dutch oven
    • Sharp knife

    Method
     

    1. Start by seasoning the chicken breasts with a pinch of salt and pepper, then cook them in a large pot with a splash of olive oil over medium heat until they are golden brown and cooked through, about 8-10 minutes. Remove the chicken and let it rest for a few minutes before shredding it into bite-sized pieces.
      1 lb boneless, skinless chicken breasts
    2. In the same pot, add a little more olive oil if needed and sauté the chopped onion until soft and translucent, about 5 minutes. The onion should become fragrant and slightly caramelized.
      1 lb boneless, skinless chicken breasts
    3. Add the minced garlic to the pot and cook for another 30 seconds until fragrant, stirring constantly to prevent burning.
      1 lb boneless, skinless chicken breasts
    4. Pour in the chicken broth and bring the mixture to a gentle simmer. Stir in the cumin, chili powder, and oregano, allowing the flavors to meld for about 5 minutes.
      1 lb boneless, skinless chicken breasts
    5. Add the drained white beans and shredded chicken into the broth. Stir everything together and let it simmer uncovered for another 10-15 minutes, until the chili has thickened slightly and the flavors are well combined.
      1 lb boneless, skinless chicken breasts
    6. Taste the chili and adjust seasoning with salt and pepper as needed. If you like it creamier, stir in the sour cream until fully incorporated and smooth.
      1 lb boneless, skinless chicken breasts
    7. Once the chili is hot and the flavors are balanced, remove it from heat. Serve the white chicken chili in bowls, garnished with fresh herbs or a dollop of sour cream if desired.
    As the aroma of cumin and garlic fills your kitchen, it’s clear this white chicken chili is more than just a meal. It’s a small celebration of simple ingredients coming together with warmth and ease. Every spoonful carries the promise of cozy nights and shared conversations.

    So, next time you’re craving something hearty yet light, remember this recipe. It’s a reminder that comfort food can be quick, nourishing, and just a little bit special. Enjoy crafting your own bowl of soothing goodness, one tender bite at a time.