Blog

  • Fizzing Nostalgia: The Unexpected Charm of Coke Slushies

    Fizzing Nostalgia: The Unexpected Charm of Coke Slushies

    Growing up, the sight of a fizzy Coke melting into icy perfection was a summer treat that echoed childhood laughter and simple joys. Today, I stumbled upon my old recipe stash and decided to revive this childhood favorite with a twist that’s perfect for lazy weekend afternoons. The aroma of sweet caramel mingling with a touch of ice-cold thrill transports me straight to carefree days.

    This recipe isn’t just about quenching thirst; it’s about reliving memories and creating new ones with a splash of soda and a swirl of nostalgia. Its charm lies in its effortless charm and the playful crackle it offers with every sip. It’s a quick escape from the rush, wrapped in a glass of icy sweet fizz.

    Fizzy Coke Ice Melts

    Fizzy Coke Ice Melts are a refreshing, nostalgic beverage made by pouring chilled Coke over crushed ice until it slightly fizzes and begins to melt, creating a bubbly, icy drink. The final appearance features sparkling, ice-cold liquid with bits of ice floating on top, offering a sweet and effervescent texture.
    Prep Time 5 minutes
    Total Time 5 minutes
    Servings: 1
    Course: Main Course
    Cuisine: American
    Calories: 150

    Ingredients
      

    • 1 cup chilled Coca-Cola Pour over ice for the fizzy effect
    • 1 cup crushed ice Use finely crushed ice for a slushy texture

    Equipment

    • Glass
    • Crushing tool (e.g., rolling pin or blender)

    Method
     

    1. Fill a glass halfway with crushed ice, creating a bed that’s cold and inviting.
    2. Pour the chilled Coca-Cola slowly over the crushed ice, allowing it to fizz up and bubble around the ice particles.
      1 cup chilled Coca-Cola
    3. Watch as the Coke begins to melt slightly, creating a sparkling, icy, and effervescent mixture with small ice fragments floating on top.
    4. Enjoy immediately with a straw or a spoon, savoring the sweet, fizzy, icy textures.

    This Coke slushie recipe is a quick journey back to simpler times, flavored with the zest of summer memories. It’s a cold comfort and an ice-cold celebration rolled into one, perfect for the season’s high heat or any spontaneous craving.

    In a world rushing forward, some classics hold their space for a reason. This simple mix of soda, ice, and a dash of fun reminds me that sometimes the best solutions are refreshingly straightforward. And it’s always ready to turn a dull moment into a bright one, in the blink of an eye.

  • Sparkling Secrets: The Art of the Perfect Champagne Slushie

    Sparkling Secrets: The Art of the Perfect Champagne Slushie

    Ever wondered how to freeze the bubbly just enough to create a silky, chilled mist that tingles on your tongue? This recipe isn’t just about mixing champagne with ice; it’s about transforming the way you enjoy your favorite sparkling wine during lazy summer afternoons or festive gatherings. The thrill lies in snagging that elusive perfect texture—frozen enough to resemble a sorbet, yet maintaining the luscious fizz that makes champagne special.

    I’ve spent countless summer days tinkering with different ratios and techniques, craving something that’s both refreshing and sophisticated. Over the years, I’ve found that a little twist—like a splash of fruit juice or a dash of bitters—elevates the experience from ordinary to unforgettable. This bubbly frozen treat can make any moment feel a tad more luxurious without breaking the bank.

    Frozen Champagne Bubbles

    This dessert involves freezing champagne to create a silky, sorbet-like texture while preserving its natural fizz. The mixture is chilled until semi-frozen, resulting in a bubbly, smooth treat with a glistening appearance. Optional additions like fruit juice or bitters can enhance the flavor profile for serving at warm gatherings.
    Prep Time 15 minutes
    Cook Time 1 hour
    Total Time 1 hour 15 minutes
    Servings: 4
    Course: Main Course
    Cuisine: Fusion
    Calories: 120

    Ingredients
      

    • 1 bottle champagne preferably chilled
    • 1/4 cup fruit juice (optional) adds flavor, such as berry or citrus
    • 1 dash bitters (optional) for a more complex flavor
    • to taste sugar syrup (optional) if a sweeter taste is preferred

    Equipment

    • Measuring cups and spoons
    • Mixing bowl

    Method
     

    1. Pour the champagne into a mixing bowl and gently stir in any fruit juice, bitters, or sugar syrup if using, to flavor the mixture.
    2. Place the bowl in the freezer, allowing the champagne to chill and partially freeze for about 45-60 minutes, stirring every 15 minutes to ensure even freezing and prevent large ice crystals from forming.
    3. As the mixture begins to firm up with a slushy consistency, gently scrape the surface with a fork to break up frozen layers and aerate the mixture.
    4. Continue stirring until the mixture reaches a smooth, semi-frozen state, with a texture similar to sorbet and maintaining some of the bubbly effervescent qualities.
    5. Serve immediately in chilled glasses, garnished with fruit or herbs if desired, to enjoy the silky, bubbly treat with shimmering appearance and refreshing taste.

    Notes

    For best results, sip the mixture shortly after serving to experience the optimal balance of creaminess and fizz.

    Whether you’re celebrating a quiet evening or hosting a lively brunch, this champagne slushie adds a touch of sparkle to any occasion. Its cool, effervescent charm makes it perfect for those warm days when the only thing better than a glass of champagne is a spoon full of frozen bubbly bliss.

    Remember, the key is to keep it simple and let the champagne’s natural sparkle do the talking. When it’s all about catching that perfect balance of chill and fizz, this treat will never let you down. Cheers to many more cold, bubbly adventures that remind us to enjoy the little moments.

  • Frozen Berry Bliss: The Surprising Charm of Strawberry Slushies

    Frozen Berry Bliss: The Surprising Charm of Strawberry Slushies

    Imagine a summer day when the only thing that can cool down the chaos of the sun is a sweet, icy treat. That’s where this strawberry slushie comes into play, but here’s the twist: I like to add a hint of fresh basil for an unexpected herbal note. It’s the kind of small change that turns a standard drink into a refreshing adventure.

    My kitchen smells like ripe strawberries and crushed ice, a scent that instantly transports me back to childhood porch sittings. This recipe is perfect for when you want something thick, icy, and just a little bit grown-up. It’s more than a drink; it’s a mini celebration in a glass, crafted with love and a dash of daring.

    Strawberry Basil Slushie

    This strawberry basil slushie is a icy, refreshing beverage made by blending ripe strawberries, fresh basil leaves, and crushed ice until smooth. The final texture is thick and chill with a vibrant red color and a hint of herbal aroma, perfect for summer quenching.
    Prep Time 10 minutes
    Total Time 10 minutes
    Servings: 2
    Course: Main Course
    Cuisine: American
    Calories: 60

    Ingredients
      

    • 2 cups fresh strawberries, hulled
    • 4 leaves fresh basil
    • 1 cup crushed ice
    • 1 tbsp honey or agave syrup optional for sweetness

    Equipment

    • Blender
    • Measuring cups and spoons

    Method
     

    1. Place the hulled strawberries, fresh basil leaves, crushed ice, and honey in the blender.
    2. Secure the lid and blend on high speed until the mixture is smooth and evenly icy, about 30 seconds. The texture should be thick and slushy.
    3. Pause the blender to check the consistency; if it’s too thick, add a splash of water or juice and blend again briefly.
    4. Taste the slushie and add more honey if you want extra sweetness, then give it one more quick blend.
    5. Pour the chilled strawberry basil slushie into glasses, distributing evenly.
    6. Garnish with a small basil leaf or a fresh strawberry slice for a beautiful presentation.
    7. Serve immediately with a straw or a small spoon for scooping. Enjoy the icy, herbal-infused refreshment!

    Notes

    For a more intense basil flavor, add an extra leaf or two. Adjust sweetness to taste with honey or agave syrup.

    There’s something irresistibly satisfying about turning simple ingredients into this vibrant, cold treat. As the season shifts and berries flood markets, this slushie is a reminder of fresh beginnings and sweet escapes. It’s a small joy that you can whip up in minutes, no blender skills required.

    Enjoy it with friends or on your own—either way, it’s a burst of summer in every sip. Keep a stash of frozen strawberries for when the craving strikes. This little frozen wonder never fails to bring a smile, even on the busiest days.

  • Bewitchingly Fun Halloween Witch Finger Cookies

    Bewitchingly Fun Halloween Witch Finger Cookies

    Halloween is the one time of year when the kitchen becomes a portal to spooky creativity. As I mix up these witch finger cookies, I love imagining tiny spells stirring within the dough, waiting to cast a giggly fright. The smell of buttery vanilla and almond naturally makes me think of a mischievous witch’s secret lair, hidden behind a bubbling cauldron.

    This recipe transforms simple ingredients into edible magic that’s perfect for scaring and delighting at any October gathering. The best part? Crafting these eerie finger-shaped treats turns into a playful chaos, especially when kids join in the fun. Each lumpy, crooked finger is a reminder of the whimsical chaos that makes Halloween so special.

    WHY I LOVE THIS RECIPE?

    • It combines my love for baking with my obsession for all things eerie and fun.
    • Creating these meant I could indulge in spooky giggles with the little monsters in my home.
    • The crispy edges and soft insides give a perfect bite, like a tiny enchanted snack.
    • Decorating with almond nails makes each finger uniquely creepy and delightful.
    • This recipe is simple enough for last-minute Halloween magic.

    AVOID MY DISASTER (You’re Welcome)

    • FORGOT the almond nails? The fingers looked plain and lost their creepy charm. Add them after baking.
    • DUMPED the dough mix in the oven too early? The fingers flattened out. Chill the dough first.
    • OVER-TORCHED cookies? The smell of burnt butter can ruin the mood. Watch closely in the last few minutes.
    • MISSED adding the red jam? The fingers lacked a bloody effect. Keep some on hand to dab on.

    QUICK FIXES THAT SAVE YOUR DAY

    • When dough fells sticky, sprinkle more flour and knead gently.
    • Splash some cold water onto fingertips if dough becomes unmanageable.
    • Patch cracked fingers with extra dough bits before baking for a more convincing look.
    • Shield your fingers from over-baking by setting a timer at 10 minutes.
    • If you overshoot, brush with butter and sprinkle cinnamon for instant aroma.

    Witch Finger Cookies

    These witch finger cookies are shaped into creepy, crooked fingers with a crisp exterior and a soft, chewy interior. Made from a buttery vanilla and almond-flavored dough, they are decorated with almond nails and red jam to create a spooky Halloween treat that combines playful creativity with delicious textures.
    Prep Time 20 minutes
    Cook Time 12 minutes
    Total Time 32 minutes
    Servings: 12
    Course: Main Course
    Cuisine: Halloween
    Calories: 120

    Ingredients
      

    • 1 cup unsalted butter softened
    • 1 cup granulated sugar
    • 1 large egg at room temperature
    • 1 teaspoon vanilla extract
    • 1/4 teaspoon almond extract
    • 2 1/2 cups all-purpose flour sifted
    • 1/2 teaspoon baking powder
    • 1/4 teaspoon salt
    • red fruit jam for decorating to mimic blood
    • 12 almond slices for nails place on baked fingers

    Equipment

    • Mixing bowls
    • Baking sheet
    • Parchment paper
    • Cooling rack
    • Small knife or toothpick

    Method
     

    1. Cream together softened butter and sugar in a mixing bowl until the mixture is light and fluffy, approximately 2-3 minutes, and you see a pale, airy texture.
    2. Add the egg, vanilla, and almond extracts to the bowl, beating until the mixture is smooth and well combined, about 1 minute. The mixture will look glossy and slightly increased in volume.
    3. In a separate bowl, whisk together the sifted flour, baking powder, and salt. Gradually add these dry ingredients to the wet mixture, mixing on low speed or folding until just combined. The dough will start to come together and feel firm yet pliable.
    4. Gather the dough into a ball, wrap it in plastic wrap, and chill in the refrigerator for at least 30 minutes. Chilling helps relax the dough so it shapes more easily and maintains its form during baking.
    5. Preheat your oven to 350°F (175°C). Line a baking sheet with parchment paper to prevent sticking.
    6. Remove the dough from the fridge and divide it into manageable portions. Roll each portion into a long, skinny finger shape, about 4 inches long, tapering slightly at the ends to resemble these spooky fingers. Place them on the prepared baking sheet, leaving space between each.
    7. Bake the fingers in the preheated oven for about 12 minutes, or until the edges are just starting to turn golden brown. Keep a close eye on them near the end to avoid over-baking and losing that soft, chewy interior.
    8. Once baked, carefully remove the fingers from the oven and let them cool on a cooling rack. This allows the crispy exterior to set and makes decorating easier.
    9. Use a small knife or toothpick to make a tiny slit near the tip of each finger and dab a small amount of red jam to create a bloody effect.
    10. Place an almond slice at the top of each finger for a creepy nail, gently pressing to secure it in place.
    11. Arrange your witch fingers on a serving platter and prepare to delight your guests with this eerie treat—ready to serve once the jam and nails are in place.

    These creepy cookies are more than just treats; they’re a small ritual in my Halloween calendar. Cutting, shaping, and decorating these pale, gory fingers bring back childhood memories of costume parties and candy hunts. They serve as a delicious reminder that sometimes, chaos in the kitchen leads to the most memorable moments.

    As the season peaks, I find comfort in these little projects that blend spooky fun with the warmth of home baking. Watching the faces light up when the cookies come out of the oven—perfectly imperfect—is its own kind of magic. No matter the missteps, they taste like a sweet, slightly sinister hug from the kitchen.

  • Unexpectedly Cozy: Vegan Pumpkin Soup with a Twist

    Unexpectedly Cozy: Vegan Pumpkin Soup with a Twist

    As the leaves turn and a chill settles in, I find myself craving a bowl that feels both nostalgic and unexpectedly refreshing. This vegan pumpkin soup isn’t just your average comfort food; it’s infused with surprising spices and a splash of citrus that brightens every spoonful. It’s perfect for those evenings when you want warmth with a hint of brightness.

    What makes this recipe stand out is how easily it transforms simple ingredients into a symphony of flavors. No heavy cream, no fuss—just a smooth, velvety texture and a complex aroma that beckons with every ladle. It’s the kind of dish that sparks joy even before the first sip.

    This soup is my secret weapon for chilly days, packed with seasonal pumpkin and aromatic herbs. It’s become a staple in my kitchen, especially when I want something nourishing yet lively. Combining nostalgic comfort with a fresh twist keeps me coming back for more every fall.

    Vegan Pumpkin Soup with Citrus and Spices

    This vegan pumpkin soup combines roasted or cooked pumpkin with aromatic spices and a splash of citrus for brightness. The ingredients are blended into a smooth, velvety texture, resulting in a warm, inviting dish with a bright and complex aroma. It features a rich, creamy consistency without dairy and a vibrant flavor profile.
    Prep Time 10 minutes
    Cook Time 30 minutes
    Total Time 40 minutes
    Servings: 4
    Course: Main Course
    Cuisine: Vegan
    Calories: 150

    Ingredients
      

    • 4 cups pumpkin puree roasted or cooked pumpkin
    • 1 tablespoon olive oil for sautéing
    • 1 small onion finely chopped
    • 2 cloves garlic minced
    • 1 teaspoon ground cumin
    • 1/2 teaspoon ground cinnamon
    • 1 cup vegetable broth
    • 1/2 cup orange juice freshly squeezed for brightness

    Equipment

    • Large pot
    • Blender or immersion blender

    Method
     

    1. Heat a large pot over medium heat and add the olive oil. Once shimmering, add the chopped onion and sauté until soft and translucent, about 5 minutes, releasing a sweet aroma.
    2. Add the minced garlic, ground cumin, and cinnamon to the pot. Stir constantly for about 1 minute, until fragrant and slightly golden, filling the kitchen with warm spices.
    3. Pour in the vegetable broth and orange juice, stirring to combine. Bring the mixture to a gentle simmer, allowing the flavors to meld for about 5 minutes.
    4. Add the pumpkin puree to the pot, stirring well to incorporate all ingredients. Continue simmering for another 10 minutes, letting the soup thicken slightly and the flavors deepen.
    5. Use an immersion blender directly in the pot or transfer the soup to a blender to purée until smooth and velvety. Be careful of hot splashes and process in batches if needed.
    6. Taste the soup and season with salt and pepper as desired. Stir to combine, then reheat briefly if necessary to serve hot.

    Notes

    For an extra touch, garnish with fresh herbs or a drizzle of coconut cream. Leftovers store well in the refrigerator for up to 3 days.

    This vegan pumpkin soup embodies the magic of seasonal ingredients transformed lovingly into something comforting and vibrant. It’s perfect for chilly nights, when a warm bowl can turn an ordinary evening into something special. Plus, its bright flavors remind me that comfort doesn’t have to be boring.

    Now that you know the tricks and pitfalls, I hope your next batch turns out as cozy and flavorful as you imagine. It’s a simple reminder that sometimes, the smallest changes—like a dash of citrus or a splash of herbs—can make all the difference. Enjoy every spoonful, savoring both the warmth and the creativity in each bowl.

  • Spooky Fun: Halloween Monster Burgers You Can’t Resist!

    Spooky Fun: Halloween Monster Burgers You Can’t Resist!

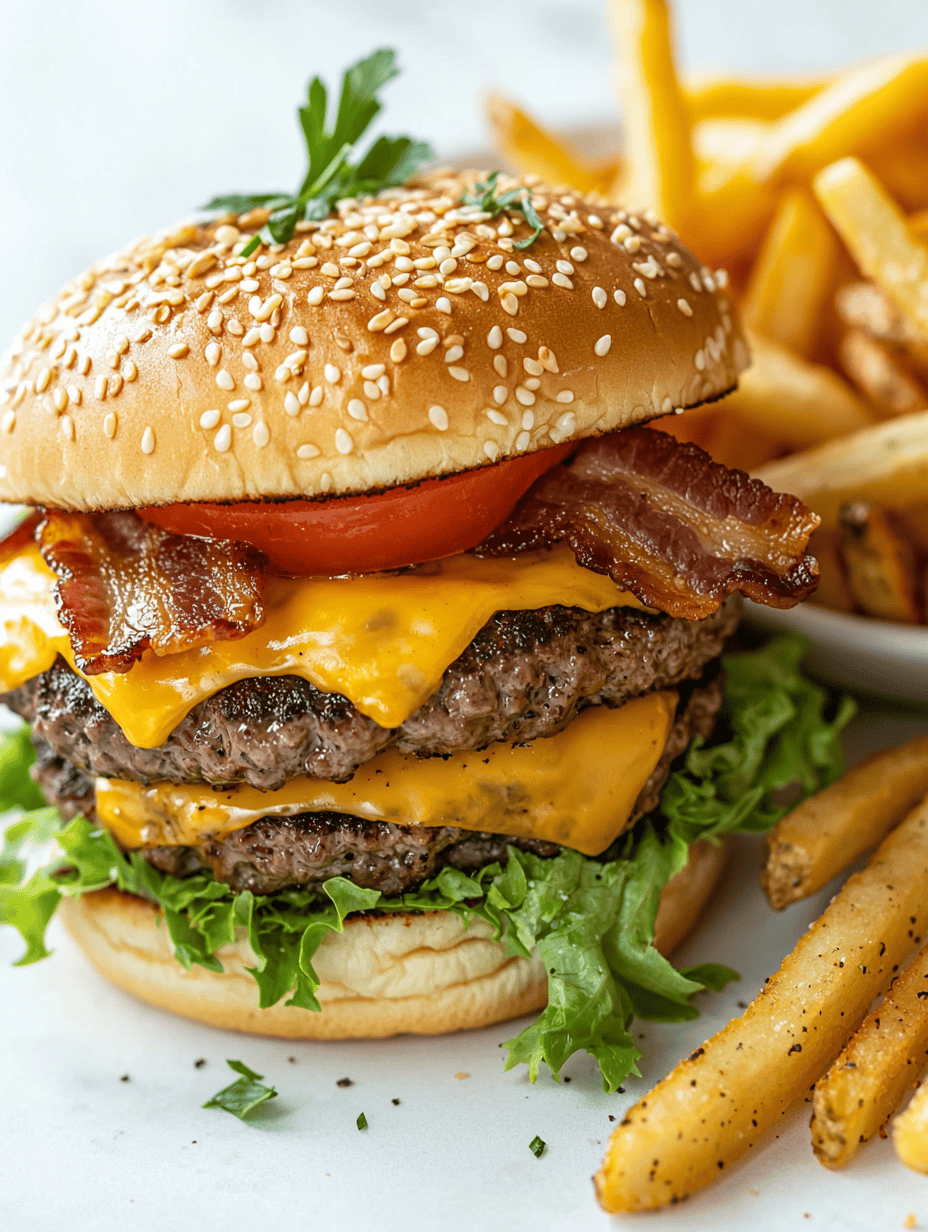
    Halloween is perfect for unleashing your wildest food ideas, and these Monster Burgers turn the ordinary into something delightfully monstrous. Using everyday ingredients, you transform a classic burger into a creature feature that’s as tasty as it is terrifying. This approach gives a playful twist to your spooky feast, sparking joy with every monstrous bite.

    There’s an unexpected charm in customizing burgers with ghoulish eyes, creepy tongues, and wild, messy hair made from toppings. I love how simple ingredients—eggs, olives, cheese—become the magic components of a costume for your meal. Plus, the chaos of decorating these burgers is half the fun, especially when kids and adults alike get involved.

    Monster Burgers

    Monster Burgers are playful, visually striking sandwiches made by transforming classic beef patties into imaginative creatures using simple ingredients like cheese, olives, and eggs. The burgers are assembled with toppings and decorated to resemble ghouls and monsters, creating a fun and spooky presentation. The final appearance features a juicy patty dressed with colorful, quirky adornments that evoke a monstrous face.
    Prep Time 20 minutes
    Cook Time 15 minutes
    Total Time 35 minutes
    Servings: 4
    Course: Main Course
    Cuisine: American
    Calories: 650

    Ingredients
      

    • 1 pound ground beef 80% lean for juicy burgers
    • 4 slices cheddar cheese for melting over patties
    • 1 large egg hard boiled, for eyes
    • a few black olives black olives pitted, for eyes and decorations
    • 4 small hot dog buns or burger buns, toasted
    • 2 tablespoons ketchup for monster tongues or decoration
    • 1 small red bell pepper for tongues
    • 1 small onion for messy hair, optional
    • to taste salt and pepper for seasoning

    Equipment

    • Grill or Skillet
    • Spatula
    • Knife
    • Cutting board
    • Toothpicks or Skewers

    Method
     

    1. Preheat your grill or skillet over medium-high heat, preparing it for cooking the beef patties.
    2. Divide the ground beef into four equal portions and gently shape each into a round patty, about half an inch thick. Season with salt and pepper on both sides.
    3. Place the patties onto the hot grill or skillet. Cook for about 4-5 minutes per side, until they develop a nicely browned crust and are cooked through.
    4. While the patties are cooking, cut the cheddar cheese into small squares to melt over the hot patties, and slice the red bell pepper into thin strips for monster tongues.
    5. Once the burgers are cooked, place a cheese square on each patty during the last minute of cooking to melt slightly.
    6. While the burgers rest briefly, hard boil the egg, then peel and cut it into small slices or rounds for monster eyes.
    7. Toast the buns lightly until golden, then set aside.
    8. Assemble each monster burger by placing the cooked patty inside each toasted bun. Decorate with egg slices for eyes, inserting a black olive or two into each egg slice to mimic pupils.
    9. Use strips of red bell pepper or ketchup to create spooky tongues hanging from the burgers, and add messy hair made from thin onion slices on top for a wild look.
    10. Finish the monster faces with additional olives or small toppings for extra creepy details. Secure decorations with toothpicks or skewers if needed.
    11. Serve the Monster Burgers immediately with your favorite sides and enjoy these fun, spooky creations!

    Notes

    Feel free to get creative with your monster features! Additional toppings like lettuce, tomatoes, or cheese shreds can add more character and flavor.

    As Halloween draws near, these Monster Burgers offer a perfect blend of fun, flavor, and a touch of spooky chaos. They’re great for parties, family dinners, or just a mischievous night craving something different. Every bite is a small adventure, packed with familiar tastes and creepy fun.

    Adapting this recipe is easy—glance over your pantry, and you’ll find the perfect “monster parts” to craft your own edible creature. Whether it’s for a quick fright night snack or a centerpiece for your haunted table, these burgers bring the celebration to life with laughter and a little mess. Enjoy the spooky season with a dish everyone will remember.

  • The Surprising Art of Crafting a Lemonade Slushie with a Gourmet Twist

    The Surprising Art of Crafting a Lemonade Slushie with a Gourmet Twist

    Imagine turning a simple summer refreshment into a culinary adventure right in your kitchen. This lemonade slushie is more than just icy citrus — it’s a canvas for unexpected flavors and textures. I love experimenting with ingredients that transform ordinary drinks into memorable experiences, especially when they evoke vivid memories of childhood summers interlaced with a touch of sophistication.

    Venturing beyond the usual lemon and sugar combo, I add a splash of aromatic herbs or a hint of spicy ginger to elevate the classic. The process involves blending fresh, zesty lemons with ice and just a touch of natural sweetener until the mixture reaches an irresistibly creamy texture. The result is a cold, tangy delight that cools you down while sparking curiosity at every sip.

    Herbed Lemonade Slushie

    This lemonade slushie combines fresh lemon juice blended with ice and herbal infusions to create a creamy, tangy frozen beverage. The mixture is processed until smooth and icy, resulting in a visually appealing, textured drink that is both refreshing and flavorful.
    Prep Time 10 minutes
    Total Time 10 minutes
    Servings: 2
    Course: Main Course
    Cuisine: Mediterranean
    Calories: 120

    Ingredients
      

    • 1 cup freshly squeezed lemon juice about 4 large lemons
    • 2 cups ice cubes preferably crushed or small pieces
    • 2 tablespoons honey or agave syrup adjust sweetness to taste
    • 1 teaspoon fresh chopped herbs (e.g., basil or mint) for aromatics and flavor
    • 1 inch fresh ginger root peeled and sliced thin

    Equipment

    • Blender
    • Juicer or citrus squeezer

    Method
     

    1. Juice the lemons until you have about one cup of fresh lemon juice. This provides the bright, tangy base for the slushie.
    2. Add the lemon juice, honey or agave syrup, chopped herbs, and sliced ginger into your blender. This creates a fragrant and flavorful mixture.
    3. Pour in the ice cubes into the blender. The ice will give the mixture a frosty, slushy texture as it blends.
    4. Blend on high speed until the mixture is smooth, creamy, and evenly icy, about 30-45 seconds. The ice should be fully broken down and the texture thick and slushy.
    5. Pause the blender and taste the slushie. Adjust sweetness if needed, adding more honey or syrup and blending briefly to combine.
    6. Pour the finished lemon herb slushie into chilled glasses. Garnish with extra herbs or lemon slices if desired.

    Notes

    For an extra kick, add a splash of sparkling water or tonic just before serving. Using fresh herbs enhances the aromatic quality of the drink, making it especially refreshing on hot days.

    This lemonade slushie isn’t just a seasonal treat; it’s a versatile addition to any gathering or a quick escape from the heat. Its vivid flavor punches through the summer haze and makes every sip feel like a small celebration. I find myself craving it on warmer days when a splash of bright citrus promises not only relief but also a burst of joy.

    Crafting this drink reminds me how a few simple ingredients can thrill the senses and brighten the routine. Whether served at a backyard barbecue or enjoyed alone in a quiet moment, it’s a reminder that the best recipes are often the simplest, yet most unexpected, pleasures.

  • The Secret Ingredient That Elevates Your Classic Apple Cake

    The Secret Ingredient That Elevates Your Classic Apple Cake

    Baking an apple cake might seem straightforward, but adding a pinch of an unusual spice transforms it into something memorable. Recently, I discovered that a whisper of cardamom in the batter lifts the familiar fruity aroma to new heights. It’s a tiny twist that makes the house smell like a warm, exotic orchard.

    This recipe is perfect for those crisp fall days when apples are at their peak. The joy comes not just from the taste, but from the sensory experience—crisp apples, silky batter, and that first crack of the crust. It’s a comforting bake with a surprising flavor lift that keeps everyone guessing.

    Apple Cake with Cardamom

    This apple cake features tender, sliced apples layered within a moist batter infused with aromatic cardamom. It bakes into a golden crust with a soft, fruity interior, showcasing a balance between crisp apple pieces and a delicate crumb texture.
    Prep Time 20 minutes
    Cook Time 50 minutes
    Total Time 1 hour 10 minutes
    Servings: 8
    Course: Main Course
    Cuisine: baking
    Calories: 350

    Ingredients
      

    • 3 medium apples firm variety like Fuji or Granny Smith, peeled and sliced
    • 1 1/2 cups all-purpose flour
    • 1 cup granulated sugar
    • 1/2 cup unsalted butter melted and cooled slightly
    • 3 large eggs
    • 1 1/2 teaspoons ground cardamom freshly ground if possible
    • 1 teaspoon vanilla extract
    • 1/2 teaspoon baking powder
    • 1/4 teaspoon salt

    Equipment

    • Mixing bowls
    • 9-inch cake pan
    • Spatula
    • Chef’s Knife
    • Peeler

    Method
     

    1. Preheat your oven to 350°F (175°C). Peel, core, and slice the apples into thin rounds, then set aside.
    2. In a large mixing bowl, whisk together the flour, sugar, ground cardamom, baking powder, and salt until evenly combined.
    3. In a separate bowl, beat the eggs, then add the melted butter and vanilla extract, whisking until smooth.
    4. Pour the wet mixture into the dry ingredients and gently fold with a spatula until just combined. The batter should be slightly thick but pourable.
    5. Lightly grease a 9-inch cake pan and pour half of the batter into the bottom, spreading it evenly.
    6. Arrange a layer of sliced apples over the batter, covering the surface in a decorative pattern if desired.
    7. Pour the remaining batter over the apples, smoothing the top with a spatula to ensure even coverage.
    8. Bake in the preheated oven for 50 minutes, or until the top is golden brown and a toothpick inserted into the center comes out clean.
    9. Remove the cake from the oven and let it cool in the pan for 10 minutes, then transfer to a wire rack to cool completely.
    10. Once cooled, slice the cake to reveal tender apple layers embedded in the moist crumb, with a fragrant hint of cardamom.
    11. Serve slices of the cake slightly warm or at room temperature, enjoying the combination of soft fruit and cake crust.
    This apple cake is more than just a dessert; it’s a reminder that simple ingredients, with just a little innovation, can create something extraordinary. The warm apple scent with a hint of spice is an instant refresh for the soul.

    Enjoy it with a cup of tea or a dollop of cream, and savor the nostalgia wrapped in every bite. As the days grow cooler, this cake becomes the centerpiece of cozy gatherings, inviting friends to share stories and sweet moments. Sometimes, it’s the tiniest changes that make all the difference.

  • Crispy Edges & Autumn Flavors: The Ultimate Fall Frittata

    Crispy Edges & Autumn Flavors: The Ultimate Fall Frittata

    As the air turns crisper and pumpkin spice seems to invade every corner of the grocery store, I find myself craving more than just lattes and pie.
    This season calls for a breakfast that embodies the essence of fall—warm, comforting, and vibrant. That’s where this easy fall frittata steps in, bringing fragrant herbs and hearty vegetables straight to your table.

    What makes this dish so special isn’t just its cozy taste, but its versatility. It’s perfect for lazy weekend brunches or quick weekday mornings when you need something nourishing yet simple. Plus, it uses ingredients I always keep stocked, making it a real pantry hero.

    Fall Vegetable Frittata

    This fall-inspired frittata is made by whisking eggs with aromatic herbs and sautéed seasonal vegetables like pumpkin, bell peppers, and spinach. It is baked until puffed, set, and lightly golden on top, resulting in a fluffy, tender texture with vibrant colors throughout.
    Prep Time 10 minutes
    Cook Time 20 minutes
    Total Time 30 minutes
    Servings: 4
    Course: Main Course
    Cuisine: American
    Calories: 220

    Ingredients
      

    • 6 large eggs beaten
    • 1/4 cup milk any kind
    • 1 cup pumpkin diced
    • 1 red bell pepper chopped
    • 2 cups fresh spinach roughly chopped
    • 2 tablespoons olive oil for sautéing
    • 1 teaspoon dried thyme
    • 1/2 teaspoon salt
    • 1/4 teaspoon black pepper
    • 1/4 cup grated cheese optional, such as cheddar or Parmesan

    Equipment

    • Mixing bowl
    • Frying pan
    • Oven-safe skillet or baking dish
    • Whisk

    Method
     

    1. Preheat your oven to 375°F (190°C). In a mixing bowl, whisk together the eggs, milk, dried thyme, salt, and black pepper until smooth and slightly frothy.
    2. Heat olive oil in an oven-safe skillet over medium heat until shimmering. Add the diced pumpkin and chopped bell pepper, sautéing until they begin to soften and become fragrant, about 5 minutes.
    3. Add the chopped spinach to the skillet and cook until just wilted, about 2 minutes. Stir everything to evenly distribute the vegetables.
    4. Pour the beaten egg mixture evenly over the sautéed vegetables in the skillet. Sprinkle grated cheese on top if using.
    5. Transfer the skillet to the preheated oven and bake until the frittata is puffed, set in the center, and lightly golden on top, about 15–20 minutes.
    6. Remove the skillet from the oven and let the frittata cool slightly before slicing. The final result should be fluffy, tender, and colorful with a slightly crispy top.

    Enjoying this frittata feels like wrapping yourself in a warm sweater on a chilly morning. Its crispy edges and lush, savory center become even more satisfying when paired with a steaming cup of tea or coffee. As the season continues, I’ll be making this again, embracing the flavors and comfort it offers.

    This recipe is a reminder that the simplest ingredients, combined with a bit of love, can turn into something truly memorable. Fall isn’t just for pumpkins and apples—sometimes, it’s about the humble, hearty dishes that anchor our mornings while we savor the changing leaves outside.

  • Frozen Citrus Chaos: The Gatorade Slushie Revelation

    Frozen Citrus Chaos: The Gatorade Slushie Revelation

    Ever find yourself staring into the freezer, craving something that teeters between a cool drink and a crazy dessert? Today, I stumbled upon a secret weapon: the Gatorade slushie. It’s not just for athletes—this icy concoction bridges nostalgia and chaos in every spoonful.

    Imagine freezing that neon-colored Gatorade from your childhood, then giving it a vigorous blend. The result? A frosty, tangy, slightly salty treat that makes you nostalgic with each bite but refreshes with every sip. It’s a thrill for the senses, perfect for lazy summer afternoons or a spontaneous cold snack attack.

    Gatorade Slushie

    This frozen beverage combines neon-colored Gatorade with ice to create a tangy, icy treat. The main ingredients are Gatorade and crushed ice, blended until smooth to achieve a semi-frozen, slush-like consistency with a frosty appearance. The final dish is a vibrant, refreshing drink with a slightly salty and tangy flavor profile, perfect for hot days.
    Prep Time 5 minutes
    Total Time 5 minutes
    Servings: 2
    Course: Main Course
    Cuisine: universal
    Calories: 120

    Ingredients
      

    • 2 cups Gatorade neon-colored preferred
    • 2 cups ice cubes crushed or whole, depending on blender capacity

    Equipment

    • Blender
    • Measuring cup

    Method
     

    1. Pour the Gatorade into the blender, ensuring an even liquid layer at the bottom. This sets the flavorful base for your slushie.
    2. Add the ice cubes on top of the Gatorade in the blender. The amount of ice helps achieve that icy, semi-frozen texture.
    3. Secure the lid on the blender and blend on high speed until the mixture is smooth and slushy, with a frosty appearance. This usually takes about 30-45 seconds.
    4. Stop the blender and check the consistency; it should be thick and icy but scoopable with a spoon.
    5. If needed, add a little more ice and pulse again until the perfect slushie texture is achieved.
    6. Pour the Gatorade slushie into glasses, ensuring an inviting, colorful presentation.

    Notes

    Serve immediately for the best slushie texture. You can customize the flavor by choosing different Gatorade colors or mixing flavors.

    This Gatorade slushie has transformed my summer snack game. It’s fast, fun, and brings a little chaos into a usually predictable day. No matter the season, it’s a reminder to enjoy simple, quirky pleasures that cool us down and keep things lively.

    In a world of endless snack options, sometimes the simplest idea is the most satisfying. Embrace the mess, the colors, and the tang—your taste buds will thank you for the wild ride.