Blog

  • Spiced Whisper: An Unusual Pumpkin Muffin Journey

    Spiced Whisper: An Unusual Pumpkin Muffin Journey

    As autumn draws in, I find myself craving more than just the typical pumpkin spice latte. I want to bake something that whispers seasonal warmth in every bite, yet carries a surprising twist. This recipe for pumpkin muffins takes a route less traveled—think hints of ginger, a touch of maple, and a dash of nutmeg in the batter.

    What makes these muffins different is not just their flavor but their texture—moist, tender, with crunchy streusel topping. They’re perfect for cozy mornings or unexpected guests, their aroma turning any space into a fall festival. It’s a simple pleasure, made extraordinary by a few inner secrets.

    WHY I LOVE THIS RECIPE?

    • Joy: The smell of these muffins baking makes every dull morning brighter.
    • Nostalgia: They remind me of grandparent’s kitchens, filled with warm spices and laughter.
    • Practicality: Uses pantry staples; no special trips needed.
    • Surprise: The hint of maple keeps every bite intriguing.
    • Festive: Ideal for holiday mornings or just because it’s pumpkin season.

    AVOID MY DISASTER (You’re Welcome)

    • FORGOT to preheat oven—ended up with flat muffins. Preheat thoroughly before mixing!
    • DUMPED cold milk into hot batter—curdled mess. Warm your milk first.
    • OVER-TORCHED topping—smelled acrid. Keep an eye on the oven’s heat during broiling.
    • FORGOT the baking spray—stuck to the liners. Always spray or line your muffin tins.

    QUICK FIXES THAT SAVE YOUR DAY

    • When batter is too thick—Splash in a splash of milk to loosen it.
    • When muffins crack on top—Patch with a dab of batter and a quick sprinkle of sugar.
    • When topping burns—Shield with foil and lower oven heat.
    • When muffins are dense—Fold in an extra teaspoon of baking powder.
    • When smell is off—Quickly remove from oven, stir in a pinch of cinnamon to perk up aroma.

    These muffins are more than just a seasonal bake—they’re a warm pause in your busy day. The blend of spices and the moist crumb evoke the comfort of falling leaves and crisp air. Making them feels like a small act of self-care, a moment to savor amidst chaos.

    Right now, with pumpkin spice taking over everything from lattes to candles, this recipe embraces the festive spirit while offering something uniquely satisfying. It’s a little nod to tradition but with enough twist to keep it interesting. No matter the season or reason, these muffins promise a comforting bite whenever you need it.

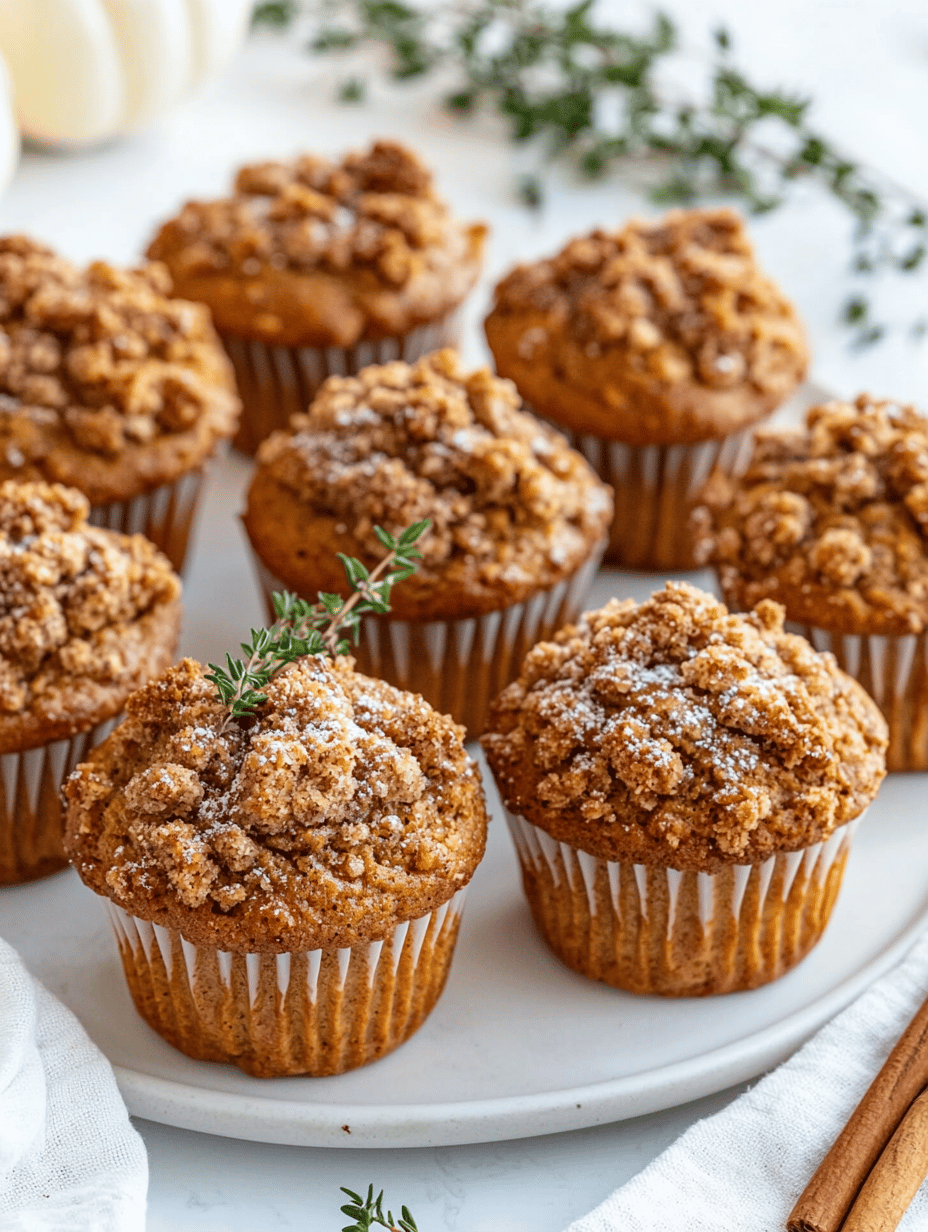
    Pumpkin Muffins with Spiced Streusel Topping

    These pumpkin muffins are moist and tender with a warm, spicy flavor profile featuring ginger, nutmeg, and a touch of maple syrup. Topped with a crunchy streusel, they showcase a golden-brown crust and a soft center, perfect for cozy mornings or fall gatherings.
    Prep Time 20 minutes
    Cook Time 25 minutes
    Total Time 45 minutes
    Servings: 12
    Course: Main Course
    Cuisine: American
    Calories: 210

    Ingredients
      

    • 1 1/2 cups all-purpose flour
    • 1 cup pumpkin puree unsweetened
    • 1/2 cup maple syrup
    • 1/3 cup vegetable oil
    • 3 large eggs
    • 1 1/2 teaspoons baking soda
    • 1 teaspoon ground ginger
    • 1/2 teaspoon ground nutmeg
    • 1/2 teaspoon salt
    • 1/2 cup brown sugar
    • 1/2 cup unsalted butter for streusel
    • 1/2 cup rolled oats for streusel
    • 1/3 cup all-purpose flour for streusel
    • additional cinnamon optional, for extra flavor in streusel

    Equipment

    • Mixing bowls
    • Muffin tin with liners
    • Whisk
    • Rubber spatula
    • Measuring cups and spoons
    • Small bowl for streusel

    Method
     

    1. Preheat your oven to 350°F (175°C) and line a muffin tin with paper liners.
    2. In a large mixing bowl, whisk together the flour, baking soda, ground ginger, nutmeg, salt, and brown sugar—until well combined and airy.
    3. In a separate bowl, beat the eggs, then stir in the pumpkin puree, maple syrup, and vegetable oil until smooth and slightly frothy.
    4. Pour the wet mixture into the dry ingredients and fold gently with a spatula until just combined; do not overmix to keep the muffins tender.
    5. In a small bowl, prepare the streusel by cutting cold butter into the oats, flour, brown sugar, and cinnamon until crumbly and sandy in texture.
    6. Spoon the batter into the prepared muffin cups, filling each about two-thirds full for a nice rise.
    7. Sprinkle the streusel evenly over each muffin, pressing down gently to help it stick.
    8. Bake in the preheated oven for 20–25 minutes, or until the muffins are golden brown and a toothpick inserted in the center comes out clean.
    9. Remove the muffins from the oven and let them cool in the tin for 5 minutes before transferring to a wire rack to cool completely.
    10. Enjoy these fragrant, moist pumpkin muffins warm or at room temperature, the streusel adding a delightful crunch in every bite.

    Notes

    Ensure the butter is cold when making the streusel for maximum crunch. Feel free to add a pinch of cinnamon to the streusel for extra spice. These muffins store well in an airtight container for up to two days or freeze for longer storage.

    Once cooled, these pumpkin muffins hold a soft, tender crumb infused with warm spices. They’re perfect on their own or with a smear of butter or honey. The slightly crunchy topping adds just the right textural contrast.

    Enjoy these muffins as a simple, cozy treat or a thoughtful gift for friends. Their aroma alone can brighten a gloomy day and bring a moment of joy. Baking them is a small ritual that celebrates the season and the warm memories tied to it.

  • Spooky Spider Cheese Ball: A Ghoulishly Good Party Staple

    Spooky Spider Cheese Ball: A Ghoulishly Good Party Staple

    Halloween parties are all about the fun and the fright, but sometimes it’s the little creepy details that steal the show. This Halloween Spider Cheese Ball transforms a classic appetizer into a terrifyingly adorable centerpiece that everyone will remember. Its spooky spider design is surprisingly simple to make but instantly screams holiday spirit.

    Choosing this recipe was inspired by a desire to add a dash of chaos to the typical cheese platter. The texture of the creamy cheese mixed with crunchy bits and the striking appearance of the spider legs crackling under a knife make each bite a tiny thrill. Plus, it’s versatile enough to be made vegan or with full-fat cream cheese, depending on your mood.

    Halloween Spider Cheese Ball

    This Halloween-themed cheese ball features a creamy mixture shaped into a round form with crunchy bits mixed in, resembling a spider’s body. The design is completed with crisp, leg-like pretzels arranged to mimic a spider crawling on a platter, creating a striking and playful appetizer for spooky parties.
    Prep Time 15 minutes
    Total Time 15 minutes
    Servings: 8
    Course: Main Course
    Cuisine: American
    Calories: 220

    Ingredients
      

    • 16 oz cream cheese, softened
    • 1 cup shredded cheddar cheese
    • 1/2 cup crushed pretzels or crushed crunchy bits adds texture and visual interest
    • to taste salt and pepper
    • 12 pretzel sticks pretzel sticks or crunchy sticks for spider legs

    Equipment

    • Mixing bowl
    • Spatula
    • Serving plate
    • Pretzel sticks or similar crunchy sticks
    • Plastic wrap or parchment paper

    Method
     

    1. Mix the softened cream cheese and shredded cheddar cheese in a bowl until smooth and well combined.
    2. Add crushed pretzels, a pinch of salt, and pepper to the cheese mixture, folding gently to incorporate the crunchy bits evenly throughout.
    3. Transfer the cheese mixture onto a piece of plastic wrap or parchment paper and shape it into a tight, round ball for the spider’s body.
    4. Wrap the ball tightly and refrigerate for at least 30 minutes to help it firm up.
    5. Once firm, remove the cheese ball from the fridge and place it on a serving plate.
    6. Arrange the pretzel sticks around the cheese ball, mimicking spider legs radiating outward and pressing slightly into the surface for stability.
    7. Adjust the pretzels to create a balanced, spider-like appearance, ensuring the legs are evenly spaced for a dramatic effect.
    8. Serve immediately or keep refrigerated until ready to display and enjoy.

    Notes

    For a vegan version, substitute vegan cream cheese and dairy-free shredded cheese. Adjust the quantity of crunchy bits to suit your texture preference.
    Whether you’re hosting a ghostly gathering or just embracing the spooky season, this cheese ball adds that perfect touch of whimsy and creepiness. It’s fast, fun, and guaranteed to spark giggles and gasps alike. As you carve out space on your table for this spider-shaped delight, enjoy the playful chaos it brings to your Halloween feast.

  • Chill Out with the Ultimate Oreo Slushie: A Nostalgic Frozen Escape

    Chill Out with the Ultimate Oreo Slushie: A Nostalgic Frozen Escape

    Imagine a hot summer day when the craving for something sweet and icy hits hard. Instead of reaching for the usual, I decided to turn my favorite childhood cookie into a refreshing slushie, blending nostalgia with a burst of cold. The aroma of crushed Oreos mingling with frozen milk instantly transports me back to carefree afternoons.

    This recipe isn’t just about cooling down; it’s a nostalgic trip that’s surprisingly elegant. The rich chocolate and creamy vanilla bits in every sip make it feel indulgent without needing fancy ingredients or a long wait. It’s perfect for those moments when you need a quick treat with a dash of your childhood.

    Oreo Milk Slushie

    This Oreo Milk Slushie is a frozen beverage made by blending crushed Oreos with milk and ice until smooth and creamy. It has a thick, icy texture with chunks of cookie throughout, offering a nostalgic flavor experience in a refreshingly cold form.
    Prep Time 10 minutes
    Total Time 10 minutes
    Servings: 2
    Course: Main Course
    Cuisine: American
    Calories: 250

    Ingredients
      

    • 8 pieces Oreo cookies plus extra for topping, if desired
    • 1 cup milk whole or 2%
    • 1 cup ice cubes about 8 small cubes

    Equipment

    • Blender
    • Measuring cups and spoons

    Method
     

    1. Place the Oreos in a plastic bag and gently crush them with a rolling pin or the bottom of a glass until finely chopped but still with some chunks for texture.
    2. Add the crushed Oreos, milk, and ice cubes into a blender.
    3. Secure the lid of the blender and blend on high speed for about 30-45 seconds until the mixture is smooth, icy, and creamy with small cookie bits visible.
    4. Stop the blender and check the consistency; if it’s too thick, add a splash of milk and blend briefly to loosen it slightly.
    5. Pour the slushie into glasses, allowing some ice and cookie pieces to stay suspended for texture.
    6. If desired, garnish with some whole or halved Oreos on top for extra crunch and visual appeal.
    7. Serve immediately with a straw and enjoy this frozen, nostalgic treat.
    This Oreo slushie feels like a tiny celebration in every sip, especially when the heat is relentless. It’s fast, fun, and perfect for spontaneous get-togethers or solo escape moments.

    Once you get the hang of blending the cookies into that icy delight, each glass becomes a little victory. The best part? It takes less than five minutes to whip up, making it a staple for hot days or lazy weekends. Enjoy every cold, crunchy, creamy sip.

  • Autumn’s Hidden Gem: The Cozy Secret of Roasted Pumpkin Soup

    Autumn’s Hidden Gem: The Cozy Secret of Roasted Pumpkin Soup

    As the leaves turn fiery reds and golden yellows, I find solace in turning a simple pumpkin into a bowl of heartfelt warmth. This isn’t your usual pumpkin soup; it’s a slow-roasted revelation that unlocks a deeper, caramelized sweetness. The ritual of roasting intensifies the flavor, filling my kitchen with the inviting aroma of fall spices and baked pumpkin.

    Each spoonful is a reminder that the best comfort foods come from honest ingredients and a little patience. The velvety texture and smoky undertones make this soup perfect for chilly evenings or a peaceful weekend afternoon. It’s a small celebration of fall, captured in a pot, waiting to be enjoyed.

    Roasted Pumpkin Soup

    This pumpkin soup is made by slow-roasting pumpkin halves until caramelized, which deepens their natural sweetness. The roasted pumpkin is then blended into a smooth, velvety puree with warm spices, resulting in a comforting, slightly smoky soup with a rich texture. Its vibrant orange color and creamy consistency make it perfect for fall occasions.
    Prep Time 15 minutes
    Cook Time 45 minutes
    Total Time 1 hour
    Servings: 4
    Course: Main Course
    Cuisine: Fall
    Calories: 150

    Ingredients
      

    • 1 medium pumpkin halved and seeded
    • 2 tablespoons olive oil for roasting
    • 1 teaspoon ground cinnamon optional for warming flavor
    • 0.5 teaspoon ground nutmeg optional
    • 0.5 teaspoon ground ginger optional
    • 1 cup vegetable broth
    • 0.5 cup coconut milk for creaminess
    • to taste Salt and pepper

    Equipment

    • Baking sheet
    • Blender or immersion mixer
    • Large mixing bowl
    • Knife
    • Cutting board
    • Pot

    Method
     

    1. Preheat your oven to 400°F (200°C). Place the halved pumpkin on a baking sheet, cut side up. Drizzle with olive oil and sprinkle with a pinch of salt if desired.
    2. Roast the pumpkin in the oven for about 40-45 minutes, until the flesh is tender and caramelized around the edges. You should see the flesh darken slightly and feel soft when pierced with a fork.
    3. Remove the pumpkin from the oven and let it cool slightly until safe to handle. Scoop out the soft flesh into a large mixing bowl, discarding the skin.
    4. Add the vegetable broth, coconut milk, cinnamon, nutmeg, and ginger to the pumpkin flesh. Use an immersion blender or transfer to a blender to puree until smooth and creamy.
    5. Pour the blended soup into a pot and warm over medium heat. Stir gently as it heats until steaming and well combined. Season with salt and pepper to taste.
    6. Once heated through, taste and adjust seasoning if needed. Serve hot, garnished with a drizzle of coconut milk or a sprinkle of herbs if desired.

    This roasted pumpkin soup isn’t just about nourishing the body; it’s about savoring the season’s most evocative flavors. As the weather cools and pumpkin patches flourish, this recipe adds a cozy, nostalgic touch to any meal plan. Let it be your warm companion on those quiet, crisp nights.

    Cooking it is a gentle reminder that great flavor often comes from taking the time to slow down. It’s a humble dish that invites conversation and sips of wine to match its rich, roasted essence. A simple, soulful way to celebrate fall at your table.

  • Enchant Your Night with a Spooky Black Magic Margarita

    Enchant Your Night with a Spooky Black Magic Margarita

    Halloween is the perfect time to embrace the mysterious and indulge in a little chaos at the cocktail table. The Black Magic Margarita isn’t just a drink, it’s an invitation to transform your party into a swirling vortex of dark allure and vibrant flavors. Its deep, black hue hides a zesty surprise that sparks curiosity and conversation.

    This recipe wasn’t born from convention; it’s a recipe that celebrates daring creativity and the thrill of the unknown. Whether you’re hosting a haunted gathering or just craving something wickedly fun, this cocktail promises to add a dash of enchantment to your evening. Let’s dive into the dark side of mixology and see what magic unfolds.

    Black Magic Margarita

    The Black Magic Margarita is a cocktail featuring a deep black hue achieved with charcoal or black liqueur, combined with tequila and citrus for a vibrant, tangy flavor. The drink has a smooth, icy texture with a striking, dark appearance that creates visual intrigue and a refreshing taste.
    Prep Time 5 minutes
    Total Time 5 minutes
    Servings: 1
    Course: Main Course
    Cuisine: cocktail
    Calories: 200

    Ingredients
      

    • 2 oz tequila blanco
    • 1 oz fresh lime juice about one lime
    • 0.5 oz black crème de cassis or black curaçao for color and flavor
    • 0.25 tsp activated charcoal powder optional, for extra darkness
    • 0.75 oz simple syrup adjust to taste
    • Ice cubes Ice for shaking and serving

    Equipment

    • Cocktail shaker
    • Strainer
    • Rocks glass
    • Measuring jigger

    Method
     

    1. Fill the cocktail shaker halfway with ice cubes and add the tequila, fresh lime juice, simple syrup, and black crème de cassis.
    2. Secure the lid tightly and shake vigorously for about 15 seconds until the mixture is well-chilled and slightly frothy.
    3. Strain the mixture into a rocks glass filled with fresh ice, using a strainer to catch any small pulp or ingredient bits.
    4. Garnish with a lime wedge or a twist of lime peel for a bright finishing touch.
    5. Serve immediately and enjoy the dark, vibrant appearance with the refreshing citrus flavor.
    As the night winds down, the haunting glow of your Black Magic Margarita will linger in memories and photos alike. Creating this drink is more than just a mixology experiment; it’s a ritual that sets the mood for chilling stories and giggles.

    Remember, the real magic lies in the shared moments and the spirited laughter. Keep your spirits high, your glass full, and enjoy the spooky season with a drink that’s as bold and daring as the costumes you wear.

  • Whimsical Pumpkin Pancakes: A Fall Breakfast Experiment

    Whimsical Pumpkin Pancakes: A Fall Breakfast Experiment

    Whether you’re celebrating Halloween, or just craving a warm hug in the shape of a pancake, this recipe is your new go-to. It’s surprisingly easy to make and fills your kitchen with that irresistible smell of baked spices. Plus, it’s a clever way to sneak veggies into a child’s breakfast or a quick energizer before a hike.

    Spiced Pumpkin Pancakes

    These pancakes are made by mixing a batter of flour, eggs, milk, and pureed pumpkin, with added warm spices for flavor. The batter is poured onto a hot griddle, cooked until golden and fluffy, resulting in tender pancakes with a speckled, spiced appearance. They are perfect for a cozy breakfast or brunch, offering a soft texture with aromatic seasoning.
    Prep Time 10 minutes
    Cook Time 15 minutes
    Total Time 25 minutes
    Servings: 4
    Course: Main Course
    Cuisine: American
    Calories: 250

    Ingredients
      

    • 1 1/2 cups all-purpose flour sifted
    • 2 teaspoons baking powder
    • 1/2 teaspoon ground cinnamon
    • 1/4 teaspoon ground nutmeg
    • 1/4 teaspoon ground ginger
    • 1/2 teaspoon salt
    • 2 large eggs beaten
    • 1 1/4 cups milk
    • 1 cup canned pumpkin purée or cooked and mashed fresh pumpkin
    • 2 tablespoons granulated sugar
    • 2 tablespoons unsalted butter melted

    Equipment

    • Mixing bowls
    • Whisk
    • Non-stick skillet or griddle
    • Spatula
    • Measuring cups and spoons

    Method
     

    1. In a large mixing bowl, whisk together sifted flour, baking powder, cinnamon, nutmeg, ginger, and salt until evenly combined.
    2. In a separate bowl, beat the eggs gently, then stir in the milk, pumpkin purée, sugar, and melted butter until smooth.
    3. Pour the wet mixture into the dry ingredients and gently fold together using a spatula until just combined; do not overmix to keep the pancakes fluffy.
    4. Preheat a non-stick skillet or griddle over medium heat, then lightly grease if necessary. Pour 1/4 cup of batter onto the hot surface for each pancake.
    5. Cook the pancakes for 2–3 minutes, until bubbles form on the surface and the edges look set, then gently flip them with a spatula.
    6. Cook for another 2–3 minutes until golden brown and cooked through, then transfer to a plate.
    7. Repeat the process with the remaining batter, adjusting the heat as necessary to prevent burning.
    8. Serve the pancakes warm, topped with your favorite toppings like syrup, whipped cream, or additional pumpkin spice if desired.
    As the leaves turn and temperatures dip, embracing seasonal ingredients like pumpkin keeps breakfast both relevant and comforting. It’s a subtle reminder that the simplest dishes can be a celebration of the latest season, bringing joy with every fluffy, spiced bite.

  • Velvet Autumn: Spiced Butternut Squash & Ginger Soup

    Velvet Autumn: Spiced Butternut Squash & Ginger Soup

    Every fall, I dive into a ritual of roasting butternut squash, letting its sweet, nutty aroma fill my kitchen as the seasons change. But this year, I decided to turn that cozy tradition into something more vibrant—adding fresh ginger for a spicy kick that awakens the senses. It’s surprising how a simple addition can transform a mellow squash into a lively, soul-warming soup.

    Gathering ingredients feels like collecting treasures — bright orange squash, fragrant ginger, a dash of coconut milk to add creaminess, and a pinch of curry powder for depth. The process is almost meditative, blending textures and scents until I get that perfect, velvety consistency that invites a spoon. This soup isn’t just food; it’s a small celebration of autumn’s harvest, ready to warm your hands and heart.

    Roasted Butternut Squash and Ginger Soup

    This soup features roasted butternut squash blended into a smooth, velvety texture, complemented by fresh ginger for a spicy warmth. Coconut milk and curry powder add richness and depth, resulting in a vibrant, autumn-inspired dish with a creamy consistency and inviting aroma.
    Prep Time 15 minutes
    Cook Time 45 minutes
    Total Time 1 hour
    Servings: 4
    Course: Main Course
    Cuisine: Autumn, Fusion
    Calories: 250

    Ingredients
      

    • 1 large butternut squash peeled, seeded, and cubed
    • 2 tablespoons olive oil
    • 1 inch fresh ginger peeled and minced
    • 1 cup coconut milk full-fat preferred
    • 1 teaspoon curry powder
    • 4 cups vegetable broth
    • to taste salt and pepper for seasoning

    Equipment

    • Baking sheet
    • Blender or immersion blender
    • Soup pot or large saucepan

    Method
     

    1. Preheat your oven to 400°F (200°C). Spread the cubed butternut squash on a baking sheet, drizzle with olive oil, and toss to coat evenly.
    2. Roast the squash in the oven for about 30-35 minutes until tender and slightly caramelized around the edges. You’ll notice it becomes fragrant and starts to soften.
    3. While the squash roasts, heat a large saucepan over medium heat. Add a splash of oil if desired, and cook the minced ginger until fragrant, about 1 minute. You’ll smell the spicy aroma filling the kitchen.
    4. Add the roasted squash to the saucepan with the ginger. Pour in the vegetable broth and bring the mixture to a gentle boil. Let it simmer for 10 minutes to allow flavors to meld.
    5. Stir in the curry powder and coconut milk. Use an immersion blender directly in the pot, or carefully transfer the mixture to a blender, and blend until completely smooth and velvety. You may want to blend in batches if using a regular blender.
    6. Return the soup to the heat and cook for another 5 minutes, stirring occasionally. Season with salt and pepper to taste. Adjust seasoning if needed and remove from heat once hot throughout.
    7. Serve the soup hot, garnished with a swirl of coconut milk or a sprinkle of fresh herbs if desired. Its creamy, vibrant orange appearance and rich aroma make it perfect for cozy autumn days.

    This soup is more than just a comforting dish; it’s a reminder to slow down and savor the little moments. The fiery ginger and mellow squash create a delightful harmony that feels like an embrace on a chilly day. As the weather cools, this bowl becomes an essential, a way to welcome fall with open arms and a full stomach.

    Whether you’re sharing it with loved ones or enjoying a quiet moment alone, I hope this recipe brings a burst of warmth and a touch of spice to your routine. It’s a humble bowl with the power to turn a gray afternoon into a cozy retreat. Nothing beats the aroma of fresh ginger and roasted squash filling the kitchen — pure magic in every spoonful.

  • The Surprising Elegance of Kool Aid Slushie

    The Surprising Elegance of Kool Aid Slushie

    When summer hits its peak, I find myself craving the simplest pleasures—like a bright, chilled Kool Aid slushie that transports me straight back to childhood picnics.

    This recipe isn’t just about nostalgia; it’s about turning an everyday drink into a vibrant, palate-pleasing treat with surprisingly chic appeal. The cold shimmer of the slushie, combined with the intense fruit flavor, makes every sip feel like a small celebration.

    Plus, making this at home means you control the sweetness and flavors. It’s a playful twist on a classic that’s perfect for cooling off during the hottest days while adding a splash of colorful fun to any gathering.

    Kool Aid Slushie

    This Kool Aid slushie is made by mixing fruit-flavored Kool Aid with sweetener and freezing the mixture until solid. Once frozen, it is crushed or stirred into a slushy, icy dessert with a vibrant color and refreshing texture. The final dish is a colorful, crunchy-on-the-outside, cold-on-the-inside frozen treat perfect for hot days.
    Prep Time 15 minutes
    Cook Time 3 hours
    Total Time 3 hours 15 minutes
    Servings: 4
    Course: Main Course
    Cuisine: American
    Calories: 150

    Ingredients
      

    • 1 cup lemon-lime Kool Aid powder or any fruit flavor
    • 1 cup granulated sugar adjust to taste
    • 4 cups water

    Equipment

    • Mixing bowl
    • Freezer
    • Fork or spoon
    • Measuring cups and spoons
    • Serving glasses

    Method
     

    1. In a mixing bowl, combine the Kool Aid powder and sugar, stirring until the sugar partially dissolves and the mixture appears evenly colored.
    2. Pour in the water gradually, whisking continuously to ensure the sugar and Kool Aid fully dissolve and the liquid becomes bright and uniform.
    3. Taste the mixture and adjust the sweetness if desired, adding more sugar for a sweeter slushie.
    4. Pour the mixture into the freezer-safe container, spreading it out evenly.
    5. Place the container in the freezer and freeze for about 3 hours, or until the mixture is solid and firm.
    6. Remove the frozen Kool Aid from the freezer and let it sit for a few minutes to soften slightly.
    7. Using a fork or spoon, scrape or stir the frozen block to create a fluffy, slush-like texture with small ice crystals.
    8. Serve the Kool Aid slushie in glasses, garnishing with a slice of lemon or a colorful straw for a fun presentation.

    Notes

    For a finer texture, you can re-freeze and scrape multiple times. Feel free to experiment with different Kool Aid flavors and sweetness levels.

    For me, this Kool Aid slushie is more than just a drink—it’s a tiny act of rebellion against the ordinary. It’s the kind of fun that brightens your day without any fuss.

    Whether you’re lounging on the porch or hosting friends, this simple recipe offers a burst of joy and a reminder that sometimes, the best things are the easiest to make and the most wildly colorful.

  • Hello world!

    Welcome to WordPress. This is your first post. Edit or delete it, then start writing!