Blog

  • Crackling Autumn Comfort: The Unexpected Charm of This Fall Chicken Casserole

    Crackling Autumn Comfort: The Unexpected Charm of This Fall Chicken Casserole

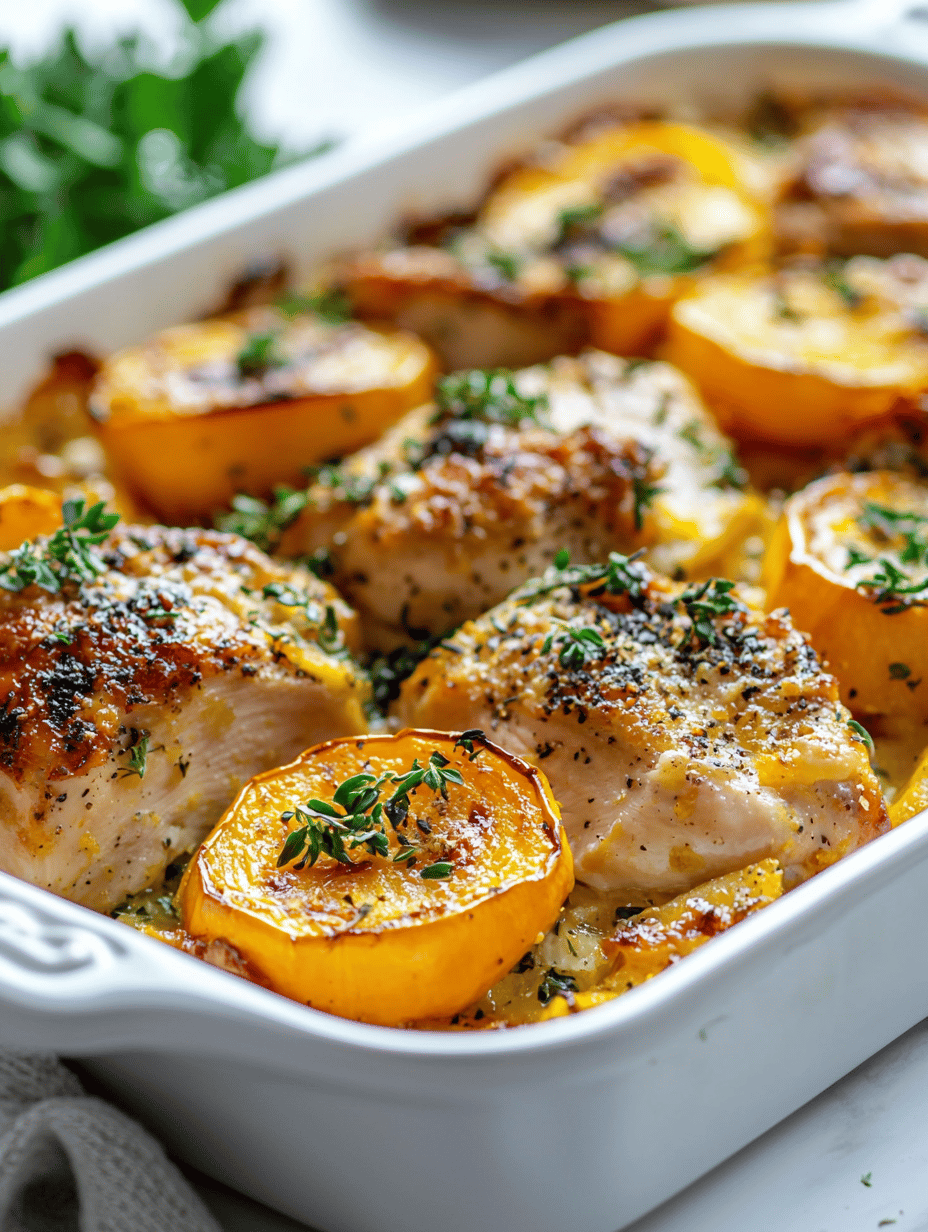
    When fall’s crisp air and changing leaves inspire you to cook something warm and hearty, this chicken casserole becomes your canvas. I love how the aromas of roasted chicken, sweet roasted squash, and fragrant herbs mingle in the oven, creating a nostalgic symphony. It’s a dish that celebrates chaos in the best way—layers of flavor and texture that surprise even the most seasoned home cook.

    This casserole isn’t just comfort food; it’s a story of the season, a bit rustic, a little wild. I add a secret splash of apple cider to the gravy for a subtle, tangy warmth that whispers fall all over your plate. It’s the kind of meal that makes you smile at the chaos and cozy chaos of autumn kitchens.

    Autumn Chicken and Squash Casserole

    This chicken casserole features tender roasted chicken combined with sweet roasted squash, all layered in a savory gravy infused with apple cider. The dish has a rustic, layered appearance with a golden-brown top, and a comforting, hearty texture that melds the flavors together beautifully.
    Prep Time 20 minutes
    Cook Time 50 minutes
    Total Time 1 hour 10 minutes
    Servings: 6
    Course: Main Course
    Cuisine: American
    Calories: 480

    Ingredients
      

    • 1.5 pounds bone-in, skin-on chicken thighs preferably organic
    • 2 cups squash cubes butternut or acorn works well
    • 2 tablespoons olive oil divided
    • 1 teaspoon salt
    • 1/2 teaspoon black pepper
    • 3 cloves garlic, minced
    • 1 cup chicken broth
    • 1/2 cup apple cider preferably unfiltered
    • 1 tablespoon flour to thicken gravy

    Equipment

    • Roasting Pan
    • Mixing bowl

    Method
     

    1. Preheat the oven to 400°F (200°C). Toss the squash cubes with 1 tablespoon of olive oil, salt, and pepper. Spread them in a single layer on a baking sheet and roast for about 25 minutes until tender and caramelized, filling the kitchen with a warm, sweet aroma.
    2. While the squash roasts, season the chicken thighs with salt, pepper, and a bit of thyme. Heat the remaining olive oil in a large ovenproof skillet or pan over medium-high heat. Place the chicken skin-side down and sear for 5-7 minutes until the skin is golden and crispy, then flip and cook for another 3 minutes.
    3. Remove the chicken from the skillet and set aside. In the same pan, add the minced garlic and cook until fragrant, about 30 seconds, releasing a warm, savory aroma. Pour in the chicken broth and apple cider, stirring to loosen any browned bits from the bottom of the pan.
    4. Sprinkle the flour into the skillet and whisk constantly to create a smooth gravy that thickens slightly as it heats—this will take about 2-3 minutes. The gravy should be bubbling gently and fragrant with the apple cider and garlic.
    5. Nestle the seared chicken thighs back into the skillet, skin side up, and pour the roasted squash evenly around them. Transfer the skillet to the preheated oven and bake uncovered for 20-25 minutes, until the chicken is cooked through and the gravy is bubbling around the edges.
    6. Remove the casserole from the oven and let it rest for 5 minutes. The chicken should be tender, with a crispy skin, and the gravy thickened into a rich sauce that coats the squash and meat. Garnish with fresh thyme if desired for a burst of herby aroma.

    Notes

    For extra flavor, add a splash of apple cider vinegar to the gravy before baking. Serve hot, with crusty bread or over grains for a complete autumn-inspired meal.
    As the casserole finishes baking, the house fills with the warm, nostalgic scent of fall. Each bite offers that perfect balance of tender chicken and crispy topping, with notes of sage and a hint of cider. It’s a dish I make year after year, especially when I crave something familiar yet exciting.

    This recipe captures the fleeting essence of fall—its imperfect beauty and hearty flavors all in one dish. It’s not just food; it’s a way to slow down, savor each moment, and celebrate the season’s bounty with loved ones or solo quietude.

  • Halloween Eyeball Pasta: Ghoulishly Delicious Meatball Surprise

    Halloween Eyeball Pasta: Ghoulishly Delicious Meatball Surprise

    As the nights grow longer and the air turns crisp, I find myself drawn to recipes that sprinkle a little spooky fun into mealtime. Halloween Eyeball Pasta turns a simple dinner into a playful spectacle, perfect for kids and adults alike. The sight of those meatball “eyeballs” peeking out from a tangled web of pasta always sparks delighted screams.

    This dish isn’t just about looks; it’s got enough savory charm to satisfy the trick-or-treaters and party guests. The smoky tomato sauce clings to each strand, while the meatballs offer a hearty, juicy bite with a freaky twist. It transforms a humble dinner into a memorable celebration of the spooky season.

    Halloween Eyeball Pasta

    Halloween Eyeball Pasta features cooked spaghetti coated in a smoky tomato sauce, topped with juicy meatball
    Prep Time 15 minutes
    Cook Time 30 minutes
    Total Time 45 minutes
    Servings: 4
    Course: Main Course
    Cuisine: American
    Calories: 550

    Ingredients
      

    • 400 g spaghetti uncooked
    • 500 g ground beef for meatballs
    • 1 cup breadcrumbs
    • 1 large egg
    • 2 cloves garlic minced
    • 400 ml tomato sauce smoky or regular
    • 2 tbsp olive oil
    • to taste salt and pepper
    • 1 small onion finely chopped
    • 1 tsp dried oregano
    • 1 tsp basil
    • 1 bunch fresh parsley chopped, for garnish

    Equipment

    • Large pot
    • Skillet
    • Mixing bowl
    • Baking sheet
    • Cooking spoon

    Method
     

    1. Boil a large pot of water, add a generous pinch of salt, and cook the spaghetti according to package instructions until al dente. Drain, toss with a little olive oil to prevent sticking, and set aside.
    2. Preheat your oven to 200°C (400°F). In a mixing bowl, combine the ground beef, breadcrumbs, egg, minced garlic, salt, pepper, and chopped parsley. Mix everything together until well incorporated.
    3. Form the meat mixture into small, roughly 1.5-inch diameter meatballs and place them on a baking sheet lined with parchment paper.
    4. Bake the meatballs in the preheated oven for about 15 minutes, or until they are browned and cooked through.
    5. While the meatballs are baking, heat olive oil in a skillet over medium heat. Add the chopped onion and cook until translucent and fragrant, about 3-4 minutes.
    6. Add the tomato sauce to the skillet with the cooked onions, stirring well. Season with oregano, basil, salt, and pepper. Bring the sauce to a gentle simmer and let it heat through while the meatballs finish baking.
    7. Carefully drop the baked meatballs into the simmering sauce. Allow them to cook for another 5 minutes, letting the flavors meld and the sauce thicken slightly.
    8. To assemble, toss the cooked spaghetti into the sauce and stir gently to coat all strands evenly. Spoon the sauced pasta onto serving plates, spacing out the meatballs so they look like creepy eyeballs.
    9. Use a small spoon or your fingers to press two black olive slices into each meatball to resemble pupils, creating a spooky eyeball effect.
    10. Garnish with chopped fresh parsley for a pop of color and fresh flavor. Serve immediately and enjoy the playful, spooky presentation of this pasta dish!

    Notes

    For extra creepiness, use mozzarella pearls or sliced jalapeños as pupils. Adjust seasoning to taste for a more savory or smoky flavor.

    Cooking this eye-catching meal reminds me how a little creativity and some everyday ingredients can create magic at the table. It’s messy, fun, and perfect for sharing stories as everyone dangles pasta from their forks like ghostly tentacles.

    With all the seasonal parties happening, this recipe is easy to pull off and even easier to love. It makes Halloween feel a little less frightening and a lot more delicious, inviting everyone to dig in without worry—just a good splash of sauce and a few goofy eyeballs.

  • Spooky Web of Wonders: Halloween Spider Web Cake

    Spooky Web of Wonders: Halloween Spider Web Cake

    Imagine a cake that captures the eeriness of a midnight spider’s web, with swirls of glossy black and ghostly white icing. This Halloween Spider Web Cake turns dessert into a visual spell, perfect for adding a haunting touch to your spooky celebration. Its intricate web pattern invites the eyes and sparks the imagination of everyone who sees it.

    Creating this cake feels like a fun, slightly chaotic craft project, where each twist and twirl of icing brings a deliciously spooky masterpiece to life. Whether you’re a baking novice or a seasoned sugar artist, this recipe is your passport to a hauntingly beautiful dessert. Plus, it smells like vanilla and dark chocolate—sweet, inviting, and just a little mysterious.

    **WHY I LOVE THIS RECIPE?**

    Halloween Spider Web Cake

    This cake features a moist vanilla sponge layered with rich chocolate frosting. The exterior is decorated with glossy black and white icing piped into an intricate web pattern, creating a haunting, spooky appearance. The final texture is soft and tender with a stunning visual contrast that mimics a spider’s web.
    Prep Time 45 minutes
    Cook Time 30 minutes
    Total Time 1 hour 15 minutes
    Servings: 12
    Course: Main Course
    Cuisine: Halloween
    Calories: 520

    Ingredients
      

    • 2 ½ cups all-purpose flour for the cake batter
    • 1 ½ cups granulated sugar for sweetness
    • 1 cup unsalted butter butter softened
    • 3 large eggs room temperature
    • 1 tablespoon vanilla extract vanilla extract adds flavor
    • 1 cup buttermilk buttermilk for moistness
    • 1 ½ cups dark chocolate chips for frosting
    • 3 cups powdered sugar for icing
    • ¼ cup unsweetened cocoa powder for chocolate icing
    • ¼ cup milk to adjust icing consistency
    • black gel food coloring black food coloring for black icing
    • white gel food coloring white food coloring for white icing

    Equipment

    • Mixing bowls
    • Hand or stand mixer
    • Cake pans
    • Cooling rack
    • Piping bags
    • Round piping tips
    • Spatula

    Method
     

    1. Preheat your oven to 350°F (175°C). Grease and flour two 8-inch round cake pans and set aside. In a large bowl, combine flour and sugar.
    2. Add softened butter to the dry mixture and beat with a mixer until crumbly. In a separate bowl, whisk the eggs, vanilla extract, and buttermilk together.
    3. Gradually add the egg mixture to the dry ingredients, mixing on low speed until the batter is smooth and fluffy.
    4. Divide the batter evenly between the prepared pans and smooth the tops with a spatula. Bake for about 30 minutes, or until a toothpick inserted in the center comes out clean.
    5. Let the cakes cool in their pans for 10 minutes, then transfer to a wire rack to cool completely.
    6. Meanwhile, melt the dark chocolate chips and let them cool slightly. Mix powdered sugar, cocoa powder, and milk to make a smooth chocolate frosting.
    7. Spread a layer of frosting over the first cake layer, then top with the second layer and apply a thin crumb coat all over the cake. Chill for 15 minutes to set the crumb coat.
    8. Frost the entire cake with the remaining chocolate icing, smoothing the surface with a spatula for an even finish. Set aside while you prepare the icing colors.
    9. Divide a portion of white icing and tint it with white food coloring. Tint another portion black with black food coloring. Fill piping bags fitted with round tips with each color.
    10. Pipe concentric circles of white icing onto the cake’s surface, creating a web pattern. Use the black icing to add radiating lines from the center outward, completing the web design.
    11. Carefully refine and straighten the web pattern with a small spatula or toothpick if needed. Allow the cake to set for at least 30 minutes before serving.
    12. Slice into the cake to reveal the soft, moist layers beneath the haunting web decor. Serve and enjoy your spooky, spooky Spider Web Cake!
    As the final touches are added, the cake looks almost too good to eat—almost. The contrast of the shiny web against the matte base makes it a striking centerpiece. This dessert isn’t just for Halloween; it’s a playful showstopper for any fall gathering.

    Baking and decorating this cake breaks away from the usual festive treats, stirring up a little creative chaos that’s oddly satisfying. It’s a reminder that some of the most memorable moments come from messy, joyful baking adventures. This cake is more than just a dessert—it’s a conversation starter, a piece of art, and a sweet taste of seasonal magic.

  • Vibrant Summer Fresh Salsa: A Garden to Table Delight

    Vibrant Summer Fresh Salsa: A Garden to Table Delight

    As the sun blazes and the garden is bursting with ripe tomatoes and fragrant herbs, I find myself craving something fresh and lively. This salsa, inspired by lazy summer afternoons and the simple joys of farm-fresh ingredients, is my go-to for elevating any meal. It’s a celebration of spontaneous flavor, made with ingredients that practically sing of the season.

    The magic lies in how this salsa transforms everyday produce into a bright, chunky masterpiece. It’s not just a dip; it’s a way to bring brightness and energy to your table. When you make it, the sweet aroma of tomatoes, zesty lime, and cilantro instantly transports you to a sunny patio or bustling farmers market.

    Fresh Tomato Salsa

    This fresh tomato salsa is made by chopping ripe tomatoes, onions, and herbs, then mixing them with lime juice and seasonings. The final dish has a chunky, vibrant appearance with a balanced combination of bright flavors and textures, perfect as a dip or topping.
    Prep Time 15 minutes
    Total Time 15 minutes
    Servings: 4
    Course: Main Course
    Cuisine: Mexican
    Calories: 20

    Ingredients
      

    • 4 cups ripe tomatoes chopped
    • 1 small red onion finely chopped
    • 1/2 cup fresh cilantro chopped
    • 1 lime lime juice freshly squeezed
    • 1 teaspoon salt
    • 1/2 teaspoon black pepper
    • 1 clove garlic minced

    Equipment

    • Knife
    • Cutting board
    • Mixing bowl
    • Spoon

    Method
     

    1. Start by dicing the ripe tomatoes into small, even pieces and place them in a large mixing bowl.
    2. Finely chop the red onion and add it to the bowl with the tomatoes, ensuring all pieces are similar in size for a balanced texture.
    3. Roughly chop the fresh cilantro and sprinkle it over the tomato and onion mixture for an herbal burst of flavor.
    4. Squeeze the juice of a fresh lime directly over the ingredients, which will brighten up the overall flavor and help meld all the components.
    5. Add the minced garlic, salt, and black pepper to the bowl to season the salsa with a well-rounded flavor profile.
    6. Stir everything gently with a spoon, mixing the ingredients until well combined and the flavors are evenly distributed.
    7. Taste and adjust the seasoning if needed, adding a pinch more salt or lime juice for brightness.
    8. Let the salsa sit for a few minutes to allow the flavors to meld and develop further.
    9. Once ready, give it a final stir and serve immediately with chips, tacos, or your favorite dishes for a fresh, zesty touch.

    Notes

    For extra flavor, add a pinch of chili flakes or diced jalapeños if you like some heat.

    Every spoonful of this salsa reminds me of carefree summer days and the beauty of simplicity. It’s a reminder that some of the best recipes come from just a handful of fresh ingredients turned into something extraordinary.

    In the midst of busy schedules and seasonal shifts, this salsa offers a refreshing pause. It’s the kind of dish that gathers people around, sparks conversations, and brings a burst of sunshine into everyday life.

  • Chill Out: The Frozen Margarita Slushie That Turns Any Day Into a Fiesta

    Chill Out: The Frozen Margarita Slushie That Turns Any Day Into a Fiesta

    Have you ever wondered how to turn a lazy summer afternoon into a vibrant celebration? The frozen margarita slushie is more than just a cool beverage; it’s a portal to sunny memories and spontaneous dance parties in your backyard. This recipe takes the traditional margarita and elevates it into a frosty, joyful chaos that’s perfect for unexpected guests or a quiet treat just for yourself.

    Imagine the icy crunch with a tangy lime punch, balanced by a whisper of tequila and a hint of sweetness. It’s a recipe that demands attention without much fuss, blending the spirit of a classic cocktail with the fun of a slushie. Perfect for those who love their drinks with a little bit of attitude and a whole lot of chill.

    Frozen Margarita Slushie

    The frozen margarita slushie is a cold, icy beverage made by blending tequila, lime juice, simple syrup, and ice until smooth. It has a granular, icy texture with a tangy lime flavor and a hint of alcohol, resembling a frozen cocktail with a vibrant, frosty appearance.
    Prep Time 10 minutes
    Total Time 10 minutes
    Servings: 2
    Course: Main Course
    Cuisine: Mexican
    Calories: 200

    Ingredients
      

    • 4 oz tequila preferably blanco
    • 2 oz fresh lime juice about 2 limes
    • 1 oz simple syrup adjust to taste
    • 2 cups ice cubes

    Equipment

    • Blender
    • Measuring cups and spoons

    Method
     

    1. Measure out the tequila, fresh lime juice, and simple syrup, then pour them into your blender.
      4 oz tequila, 2 oz fresh lime juice, 1 oz simple syrup
    2. Add the ice cubes to the blender, filling it up to about two-thirds full.
      2 cups ice cubes
    3. Secure the lid and blend on high speed until the mixture is smooth and slushy, about 30-45 seconds. Listen for the crunch of ice and watch as the mixture turns frosty and vibrant in color.
    4. Stop the blender and check the consistency; it should be thick yet scoopable with a granular texture.
    5. If desired, taste for sweetness or tartness and add more simple syrup or lime juice if needed, then briefly blend again to incorporate.
    6. Pour the frozen slushie into chilled glasses and garnish with a lime wedge or a colorful straw for presentation.

    Notes

    For a smoother texture, you can pre-freeze the glasses or run the blender longer for a finer slush. Adjust the sweetness by varying the amount of simple syrup to your taste.

    This frozen margarita slushie is more than just a drink; it’s a mood. It’s easy to whip up and bursting with flavor, making any day feel like a celebration. As the ice shatters against your teeth and the citrus hits your nose, you’ll remember why simple pleasures matter.

    With summer on the horizon and spontaneous gatherings becoming the new norm, this recipe is the ultimate go-to. It’s a reminder that sometimes, the best moments come from something chilly, tangy, and completely unplanned.

  • Eggplant Parmesan: A Rustic Twist with a Modern Flair

    Eggplant Parmesan: A Rustic Twist with a Modern Flair

    Eggplant Parmesan often feels like comfort food rooted in tradition, but I’ve discovered a way to elevate it with unexpected ingredients that add depth and a surprising crunch. This recipe takes the classic golden eggplant slices and balances them with a crispy, herb-infused crust, sprinkled with a hint of smoky paprika. It’s a dish that feels familiar but refreshes your pantry staples.

    The best part? I love how customizable this can be, turning into a lively vegetarian main or a hearty side. The aroma of bubbling cheese and roasted tomato sauce fills my kitchen with a nostalgic yet exciting scent. Each bite offers a satisfying texture contrast—crispy edges, tender eggplant, and melty cheese—making it more than just a meal.

    Eggplant Parmesan with Crispy Herb Crust

    This dish features breaded and baked eggplant slices layered with tomato sauce and melted cheese, creating a crispy exterior and tender interior. The recipe involves slicing, breading, baking, and assembling to achieve a golden, bubbly final presentation with contrasting textures.
    Prep Time 20 minutes
    Cook Time 40 minutes
    Total Time 1 hour
    Servings: 4
    Course: Main Course
    Cuisine: American
    Calories: 350

    Ingredients
      

    • 2 medium eggplants sliced into 1/4-inch rounds
    • 1 cup all-purpose flour for dredging
    • 3 large eggs beaten
    • 2 cups bread crumbs mixed with herbs and paprika
    • 1 cup shredded mozzarella cheese for layering
    • 1/2 cup parmesan cheese for sprinkling
    • 2 cups tomato sauce preferably homemade or quality jarred
    • 2 tablespoons olive oil for greasing and drizzling
    • 1 teaspoon smoked paprika mixed into bread crumbs for flavor
    • 1 teaspoon dried oregano mixed into bread crumbs
    • to taste salt and pepper for seasoning

    Equipment

    • Baking sheet
    • Shallow bowls
    • Cooking tongs

    Method
     

    1. Preheat your oven to 400°F (200°C) and line a baking sheet with parchment paper. Brush the sheet lightly with olive oil to prevent sticking.
    2. Arrange the sliced eggplant on a baking rack or tray and sprinkle with salt. Let them sit for 10 minutes to draw out excess moisture, then pat dry with paper towels.
    3. Set up three shallow bowls: one with flour, one with beaten eggs, and one with the seasoned bread crumbs mixed with smoked paprika, oregano, salt, and pepper.
    4. Dip each eggplant slice into the flour, shaking off excess, then into the beaten eggs, ensuring it’s well coated. Finally, press it into the bread crumbs, turning to coat both sides evenly.
    5. Place the breaded slices on the prepared baking sheet in a single layer. Drizzle or spray lightly with olive oil for extra crispiness.
    6. Bake in the oven for about 20-25 minutes, or until golden brown and crispy around the edges. The kitchen will fill with a toasty aroma.
    7. Reduce oven temperature to 375°F (190°C). Spread a thin layer of tomato sauce on the bottom of a baking dish or individual ramekins.
    8. Layer baked eggplant slices over the sauce, then sprinkle generously with shredded mozzarella and a little Parmesan cheese.
    9. Repeat the layering process — sauce, eggplant, cheese — until all ingredients are used, ending with a cheese layer on top.
    10. Bake uncovered for 20-25 minutes, until the cheese bubbles and turns golden. Let it rest for a few minutes to set.
    11. Garnish with a sprinkle of Parmesan, fresh herbs if desired, and serve hot, enjoying the crispy, cheesy layers and tender eggplant.

    This eggplant Parmesan recipe reminds me that comfort food doesn’t have to follow strict rules. You can experiment with different cheeses or add a splash of hot honey for a sweet heat. It’s perfect for a cozy night in or when you want to impress without too much fuss.

    Once you’ve tasted this version, the idea of eggplant Parmesan transforms. It’s become a staple in my weekly rotation, especially as the seasons shift and fresh produce becomes more vibrant. There’s a quiet satisfaction in mastering a dish that is both hearty and subtly elegant, ready to bring joy at any table.

  • Summer’s Sweetest Surprise: The Peach Crumble

    Summer’s Sweetest Surprise: The Peach Crumble

    Imagine biting into a warm slice of peach crumble, the aroma of baked peaches mingling with toasted oats and cinnamon. There’s a nostalgic magic to summer fruits baked into a comforting dessert, but what if you could elevate that simple pleasure with a unexpected twist? This recipe isn’t just about sweet peaches; it’s about transforming what you think a traditional crumble can be.

    Following a careful selection of perfectly ripe peaches, each bite offers a juicy burst against a crispy, golden topping. The secret? A hint of ginger and a drizzle of honey that enhance natural sweetness without overpowering. This dish is a harmony of textures and flavors that will make your summer gatherings unforgettable.

    Peach Crumble with Ginger and Honey

    This peach crumble features ripe peaches topped with a toasted oat mixture that incorporates ginger and honey for added depth of flavor. The dish combines juicy, tender fruit with a crispy, golden-brown topping, creating an inviting dessert with contrasting textures and warm aromas. It’s baked until bubbly and fragrant, ready to serve warm or at room temperature.
    Prep Time 15 minutes
    Cook Time 40 minutes
    Total Time 55 minutes
    Servings: 6
    Course: Main Course
    Cuisine: American
    Calories: 320

    Ingredients
      

    • 4 cups ripe peaches peeled, pitted, and sliced
    • 2 tablespoons honey preferably wildflower or local variety
    • 1 teaspoon ground ginger fresh grated if possible
    • 1 cup rolled oats plain, gluten-free if desired
    • 1/2 cup all-purpose flour or gluten-free alternative
    • 1/2 cup brown sugar light or dark
    • 1/2 cup unsalted butter cold, cut into small pieces
    • 1 pinch salt

    Equipment

    • Mixing bowls
    • Baking Dish
    • Oven
    • Measuring cups and spoons
    • Knife
    • Peeler

    Method
     

    1. Preheat your oven to 375°F (190°C). Peel, pit, and slice the peaches, then transfer them to a mixing bowl. Drizzle with honey and sprinkle with ground ginger, tossing gently to coat the fruit evenly.
    2. Spoon the coated peaches into a buttered baking dish, spreading them out in an even layer.
    3. In a separate bowl, combine the rolled oats, flour, brown sugar, and a pinch of salt. Mix well to distribute the ingredients evenly.
    4. Add the cold, cubed butter to the dry mixture. Use your fingers or a pastry cutter to work the butter into the dry ingredients until the mixture resembles coarse crumbs with some larger pea-sized pieces.
    5. Sprinkle the crumble topping evenly over the peaches, covering them completely.
    6. Place the baking dish in the oven and bake for about 40 minutes, or until the topping is golden brown and bubbling around the edges.
      Smell the toasted oats and cinnamon aroma filling your kitchen as the dish finishes baking.
    7. Remove the crumble from the oven and let it cool slightly to allow the juices to set. Serve warm, perhaps with a scoop of ice cream or a dollop of whipped cream.

    Notes

    For a spiced variation, add a pinch of cinnamon or a splash of vanilla extract to the peach mixture. Using fresh ginger enhances flavor, but ground ginger works well too. Serve with your favorite toppings for added indulgence.

    Whether served warm with a scoop of vanilla or chilled for a refreshing treat, this peach crumble is a celebration of seasonal bounty. Its simplicity makes it adaptable for any occasion, from casual family dinners to elegant outdoor parties.

    As the months grow warmer, there’s something satisfying about a dessert that is both easy to put together and bursting with flavor. The scent of baked peaches filling the house signals that summer is in full swing, inviting everyone to indulge in these sunny, comforting flavors.

  • Spooky Savory: Halloween Jack-o’-Lantern Stuffed Peppers

    Spooky Savory: Halloween Jack-o’-Lantern Stuffed Peppers

    Halloween is not just about the costumes and candies; it’s about turning ordinary ingredients into eye-catching masterpieces. These stuffed bell peppers shaped like mini Jack-o’-Lanterns add a fun, festive twist to your dinner table, making the holiday even more memorable.

    Imagine the aroma of roasted peppers mingling with seasoned cheese and savory filling, all glowing under candlelight. The unique shape gives kids and adults alike a nostalgic thrill, while still providing a wholesome, veggie-filled meal. It’s a perfect blend of spooky fun and hearty satisfaction.

    This recipe turns humble bell peppers into Halloween icons that double as a meal and decoration. They’re super adaptable—stuff with anything from spicy sausage to veggie medleys—and are sure to spark conversations. Expect smiles and a few playful screams as you serve these to your ghoulish guests.

    Halloween Stuffed Bell Peppers (Mini Jack-o’-Lanterns)

    This dish features bell peppers hollowed out and shaped with carved faces to resemble mini Jack-o’-Lanterns, stuffed with a savory filling that combines seasoned cheese and cooked grains or meat. The peppers are roasted until tender and the cheese is melted, resulting in a colorful, festive presentation with a slightly crispy exterior and soft interior.
    Prep Time 20 minutes
    Cook Time 30 minutes
    Total Time 50 minutes
    Servings: 4
    Course: Main Course
    Cuisine: Halloween
    Calories: 250

    Ingredients
      

    • 4 large bell peppers preferably orange or yellow for a pumpkin-like appearance
    • 1 cup cooked rice or quinoa as a base for the filling
    • 1/2 cup shredded cheese cheddar or mozzarella work well
    • 1 cup cooked ground meat or beans optional for added protein
    • 1 tbsp olive oil for roasting peppers
    • to taste salt and pepper

    Equipment

    • Chef’s Knife
    • Baking sheet
    • Spoon
    • Small paring knife
    • Mixing bowl

    Method
     

    1. Preheat your oven to 375°F (190°C). Slice the tops off each bell pepper and carefully scoop out the seeds and membranes, creating a hollow cavity to fill.
    2. Using a small paring knife, carve faces into each pepper to resemble mini Jack-o’-Lanterns, making eyes, a nose, and a jagged mouth for a festive look.
    3. Place the carved peppers on a baking sheet and drizzle them lightly with olive oil, then season with salt and pepper inside and out.
    4. Fill each hollowed pepper with the cooked rice or quinoa, then top with a portion of the cooked ground meat or beans and shredded cheese, pressing gently to pack the filling inside.
    5. Arrange the filled peppers on the baking sheet and bake in the oven for about 25-30 minutes, until the peppers are tender and slightly blistered, and the cheese is melted and bubbly.
    6. Remove from the oven and let cool slightly. Serve these pumpkin-like mini Jack-o’-Lanterns warm, enjoying the visual fun and savory aroma.
    Creating these Halloween stuffed peppers is a delight for both cook and party guest. Watching everyone marvel at your spooky presentation is a small thrill that makes the effort worthwhile.

    Plus, cleanup stays simple since you’re working with just a few ingredients and minimal dishes. As the season shifts into full spooky mode, these peppers keep your menu fun, festive, and full of flavor. Only the crackling of the oven will remind you this was a recipe born from the joy of Halloween.

  • Whimsical Autumn: Slow Cooker Pumpkin Fall Chili

    Whimsical Autumn: Slow Cooker Pumpkin Fall Chili

    As the leaves turn crisp and pumpkin flavors dominate the air, I find myself craving dishes that embrace the cozy chaos of fall. Instead of the usual pots, I’ve been experimenting with slow cooker magic to create a chili that’s unexpectedly sweet and savory all at once. It’s like a warm, spicy hug with a hint of autumnal nostalgia, no stove fuss required.

    This recipe to me is a celebration of seasonal bounty—a perfect way to make a hearty meal without breaking a sweat on busy fall days. The pumpkin adds a velvety texture and subtle sweetness that balances the smoky peppers and earthy beans. Plus, it smells like Thanksgiving morning simmering all day long, filling my home with warmth and rich spice.

    WHY I LOVE THIS RECIPE?

    • The combination of pumpkin and chili feels like a cozy fall secret no one talks about.
    • I love how the slow cooker turns simple ingredients into something unexpectedly luxurious.
    • The scent of cinnamon, cumin, and roasted pumpkin is pure fall nostalgia, crackling and inviting.
    • It’s an easy one-pot meal that brings comfort with every spoonful, perfect for chilly evenings.
    • Enjoying this chili feels like a small celebration of the season’s best flavors.

    AVOID MY DISASTER (You’re Welcome)

    • FORGOT to check the spice level, resulting in bland chili – add more cayenne next time.
    • DUMPED in too much pumpkin at once—balance is key, so measure carefully!
    • OVER-TORCHED the garlic, turning it bitter—use medium heat for sautéing.
    • FAILED to stir occasionally, causing sticking—use a non-stick spoon and monitor simmering.

    QUICK FIXES THAT SAVE YOUR DAY

    • When bland, splash in extra hot sauce for a fiery boost.
    • Patch over salt imbalance with a pinch of smoked paprika.
    • Shield from overcooking—turn off the slow cooker once beans are tender.
    • When the chili is too thick, stir in a splash of broth for more moisture.
    • If it smells sweet beyond pumpkin, add a squeeze of lime for brightness.

    Slow Cooker Pumpkin Chili

    This pumpkin chili is made by combining beans, roasted pumpkin, and spices in a slow cooker, then letting it simmer until flavors meld and the texture becomes thick and hearty. The dish features a velvety consistency with a balance of sweet and savory notes, topped with a rich, spicy aroma and a vibrant appearance.
    Prep Time 15 minutes
    Cook Time 6 minutes
    Total Time 6 minutes
    Servings: 4
    Course: Main Course
    Cuisine: American
    Calories: 250

    Ingredients
      

    • 1 can canned black beans drained and rinsed
    • 1 can canned kidney beans drained and rinsed
    • 2 cups roasted pumpkin chunks pre-cooked or roasted for 30 minutes at 400°F
    • 1 medium onion diced
    • 3 cloves garlic minced
    • 1 tablespoon cumin
    • 1 teaspoon cinnamon
    • 1 teaspoon smoked paprika
    • 1 teaspoon chili powder
    • 1/2 teaspoon cayenne pepper or adjust to taste
    • 1 cup vegetable broth or chicken broth
    • 2 tablespoons olive oil
    • to taste Salt and pepper

    Equipment

    • Slow Cooker
    • Chef’s Knife

    Method
     

    1. Heat a tablespoon of olive oil in a skillet over medium heat. Add the diced onion and sauté until it becomes translucent and fragrant, about 5 minutes. Transfer to the slow cooker.
      1 can canned black beans
    2. Add the minced garlic to the skillet and cook for another 30 seconds until it becomes aromatic. Pour this into the slow cooker.
      1 can canned black beans
    3. In the slow cooker, add the drained black beans, kidney beans, roasted pumpkin chunks, cumin, cinnamon, smoked paprika, chili powder, and cayenne pepper. Pour in the vegetable broth.
      1 can canned black beans
    4. Stir all ingredients well to combine. Cover the slow cooker with its lid and cook on low for about 6 hours, until the flavors meld and the chili thickens slightly.
    5. Halfway through cooking, give the chili a gentle stir to ensure even heating and prevent sticking. Adjust seasoning with salt and pepper to taste.
      1 can canned black beans
    6. Once the cooking time is complete, open the lid and check the consistency — it should be thick, velvety, and fragrant with warm spices.
    7. Ladle the pumpkin chili into bowls, garnish with your favorite toppings if desired, and serve hot to enjoy the comforting, fall-inspired flavors.

    Notes

    For a richer flavor, consider topping with sour cream or shredded cheese. Roasting the pumpkin beforehand brings out a deeper sweetness, but canned or pre-cooked pumpkin works well too.
    Once it’s ready, serve it with a side of crusty bread or a sprinkle of fresh cilantro. The combination of textures and spicy warmth creates a satisfying finale to any fall gathering. This recipe captures the essence of October evenings—warm, fragrant, and perfectly imperfect.

  • Spooky Soy Sauce Bat Wings: A Halloween Feast

    Spooky Soy Sauce Bat Wings: A Halloween Feast

    Halloween is the perfect time to get a little spooky in the kitchen. Instead of the usual pumpkin treats, why not craft something that looks as fun as it tastes? These Bat Wings are a playful twist on classic soy sauce chicken, transformed into winged creatures perfect for your haunted table.

    The aroma of soy, garlic, and a hint of sesame will fill your kitchen with a comforting, savory scent that beckons friends and family alike. The crispy skin coated with a glossy, dark glaze resembles tiny bats ready to take flight from your platter. It’s a mix of creepy and crave-worthy, making this dish a memorable centerpiece for ghostly gatherings.

    Let’s dive into how simple ingredients can turn into a fun horror-themed snack—foolproof, flavorful, and eerie enough to delight all ages.

    Halloween Bat Wings

    This dish features crispy chicken wings coated in a savory soy sauce glaze, shaped and finished to resemble tiny bats with glossy, dark skins. The wings are pan-fried or oven-roasted until crispy and then glazed, resulting in a flavorful, visually playful appetizer perfect for Halloween festivities.
    Prep Time 15 minutes
    Cook Time 30 minutes
    Total Time 45 minutes
    Servings: 4
    Course: Main Course
    Cuisine: American
    Calories: 250

    Ingredients
      

    • 20 pieces chicken wings tips removed, drumettes and flats separated
    • 3 tablespoons soy sauce
    • 2 cloves garlic minced
    • 1 teaspoon sesame oil
    • 1 tablespoon honey or maple syrup for gloss and slight sweetness
    • 1 tablespoon rice vinegar
    • 1 cup vegetable oil for frying or brushing
    • Black sesame seeds or black sesame paste for eyes and beak optional, for decorating

    Equipment

    • Large mixing bowl
    • Baking sheet or frying pan
    • Cooking thermometer (optional)
    • Brush for glazing

    Method
     

    1. Preheat your oven to 400°F (200°C) if baking, or prepare your frying setup.
    2. In a large mixing bowl, toss the chicken wings with soy sauce, minced garlic, sesame oil, and rice vinegar. Let them marinate for at least 10 minutes to absorb the flavors.
    3. Arrange the marinated wings on a baking sheet lined with parchment paper or prepare a frying pan with enough oil for shallow frying.
    4. Cook the wings until golden and crispy—about 20 to 25 minutes in the oven, turning halfway, or until crisp in the hot oil. If baking, the skin should be well browned and crispy.
    5. While the wings cook, prepare the glaze by mixing honey or maple syrup with a little soy sauce for added gloss and flavor.
    6. Once the wings are crispy and cooked through, brush or toss them in the prepared glaze to coat thoroughly, giving a shiny dark appearance that resembles bat wings in flight.
    7. Place the glazed wings back on the baking sheet or a serving plate. Use black sesame seeds or small dollops of black sesame paste to add eyes and tiny beaks to each wing, creating a spooky bat shape with edible decorations.
    8. Finish by giving the wings a final quick broil or high heat blast if you want the glaze to set with a slight caramelized crust—just a minute or two, watching carefully to prevent burning.
    9. Serve the Halloween Bat Wings hot and crispy on a platter, perfect for a spooky celebration or as a fun party appetizer.

    Notes

    For extra spooky effect, add small paper wings or edible glitter. Adjust cooking times for crispness. Use black sesame seeds for authentic bat appearance.
    As your guests marvel at these little winged wonders, you’ll enjoy the satisfying crackle of crispy skin and the burst of salty soy flavor in each bite. They’re messy, joyful, and perfect for a hands-on spooky feast.

    This recipe isn’t just festive; it’s a reminder that cooking can be quirky and whimsical. Every bite brings a smile, and in the end, isn’t that what Halloween is all about? Happy haunting and happy eating!